
|
We have all received PDFs via email that we have been asked to sign. But printing, signing, scanning and reattaching the PDF to an email can be a pain! One option is to open and sign the PDF in Adobe Acrobat (or the Preview app on your Mac) and then attach the document to your email. But did you know that you can also sign a PDF (or a JPEG for that matter) within the Mail app on your Mac itself? Read on to find out how... To get started, open the Mail app on your Mac and create a new email message. Attach the PDF or JPEG you want to sign to your email, either by clicking on the paperclip attachment button in the toolbar or dragging the PDF file from your desktop or Finder. Note: if you want to reply to an email that already has the PDF you want to sign attached, hit ‘Forward’ instead of ‘Reply’ (typing the recipient’s email address in the ‘To;’ section), and the PDF you need to sign will be included in the email. If your attachment has just one page, you’ll see a preview of it in your email; if it has multiple pages, it will just show a small icon. Whether it’s a preview or an icon, hover your cursor over the attachment, and it will reveal a tiny downward-pointing arrow or ‘V’ in the upper right-hand corner. Click on this arrow and you will see ‘Markup’ as the first option – click on this.  Once you’re in Markup, you’ll see a toolbar along the top of the document. Click on the little icon that resembles a signature to add your own signature. (If you have already created your own signature, you can skip the following step – and if not, you will only have to do this once!). At the bottom of the little window that appears, click on ‘Create Signature’. You then have 3 options: 1) use the trackpad to draw your signature, 2) sign your signature on a sheet of paper and hold it up to the camera on your Mac, or 3) use your iPhone as a trackpad to draw your signature.  When you are finished, click ‘Done’ and your signature will be saved within Apple Mail.  Once you have created a signature, click on the little picture of it, and a larger version will appear in the body of the PDF or JPEG attachment of your email.  You can then use the mouse or trackpad to drag your signature to where you would like it to be (and click on one or more of the little the blue dots in the corners to resize it, if required). Then click ‘Done’ to save your newly signed document to your email.  You can then send the email as usual.
0 Comments
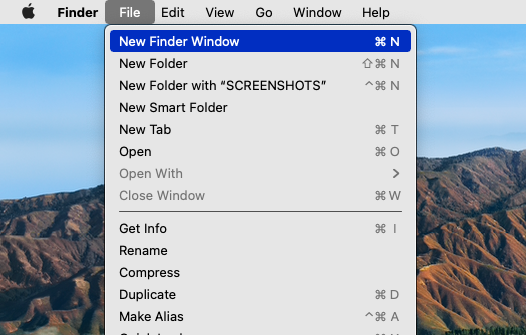
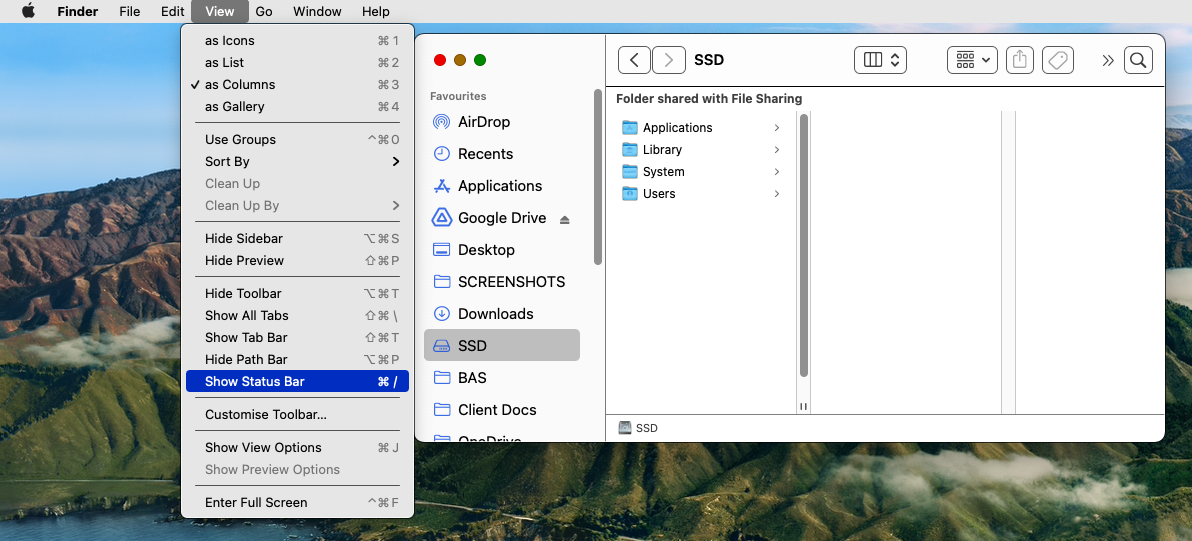
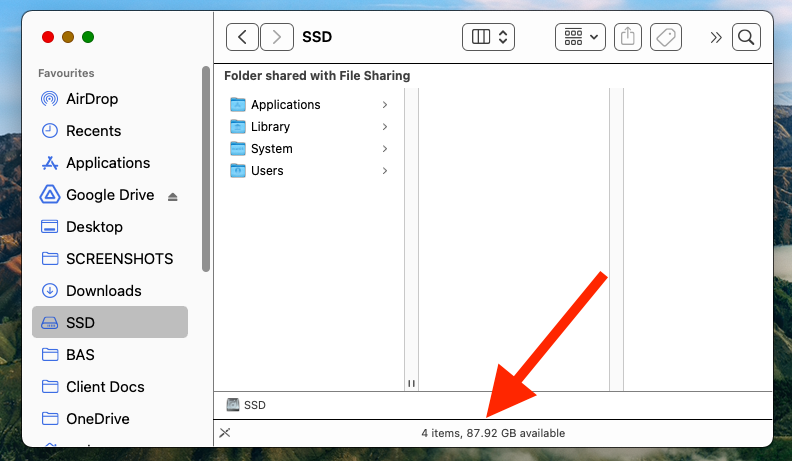
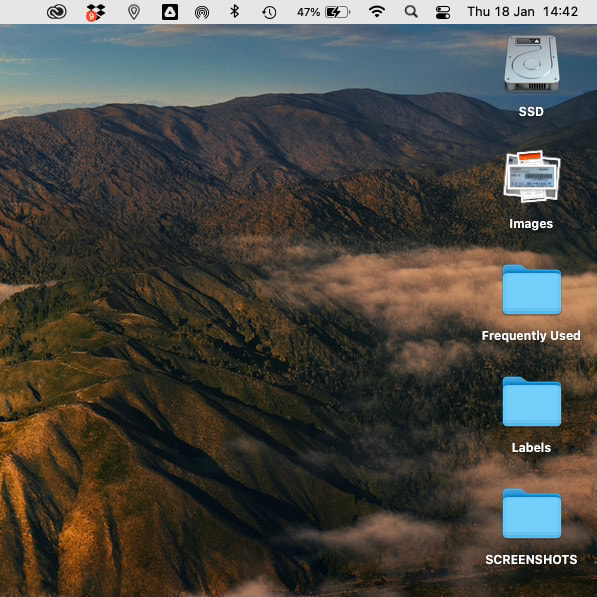
There are many reasons why you might want to check how much hard drive space you have available on your Mac, including whether you have sufficient space for an OS software update, or for a large download. There are a few ways to check this, so read on to find out more, and choose the one that best suits your needs. 1. Using the FinderThe simplest way to find out how much free disc space you have available is through Mac’s Finder app. And there are two ways to achieve this. 1.1. Click on the hard drive image* on your Desktop (*if you can’t see your hard drive on your desktop, in Finder go to the top menu and click on ‘Finder’ > ‘Preferences’ then click on ‘General’ and check that the ‘Hard disks’ box is ticked). The press the spacebar on your keyboard – et voilà!  1.2. Alternatively, you can turn on Finder’s Status Bar to see an overview of your free disk space at all times. In Finder, open a new Finder window (‘File’ > ‘New Finder Window’). Then click on ‘View’ and select ‘Show Status Bar’. An additional line will appear at the bottom of the Finder window showing the number of items in the disk or folder selected, as well as how much space is available.
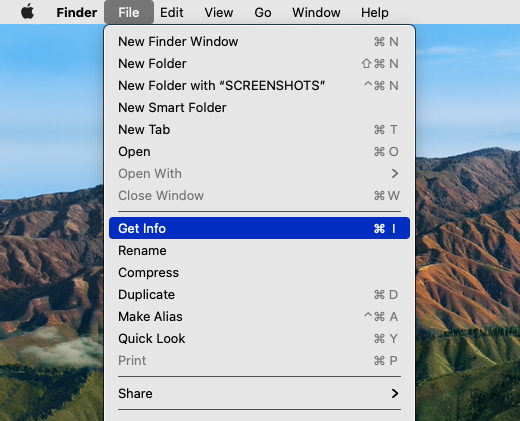
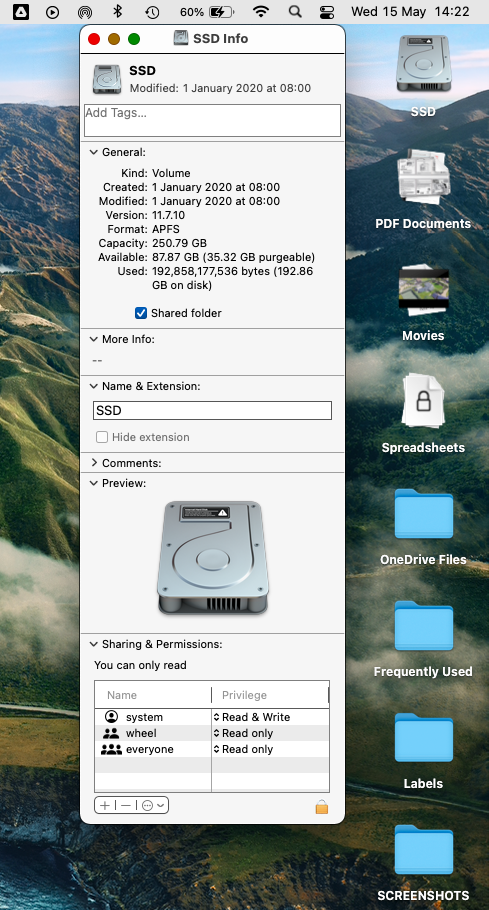
2. Get InfoClick on either the hard drive image on your desktop or in a Finder window sidebar (if it doesn’t appear, see * above). Then in the top menu bar, click on ‘File’ > ‘Get Info’ (or shortcut ⌘ I). This opens a window that shows the capacity, available and used space, permissions, etc.
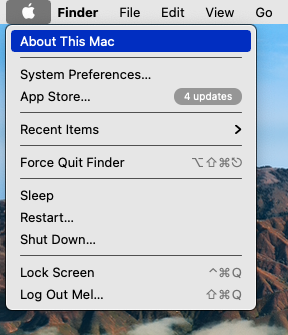
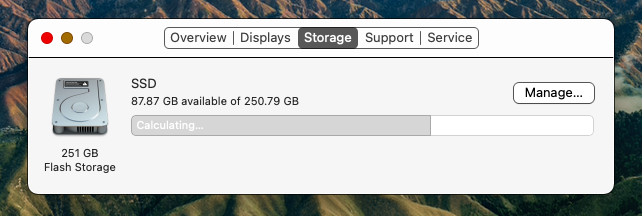
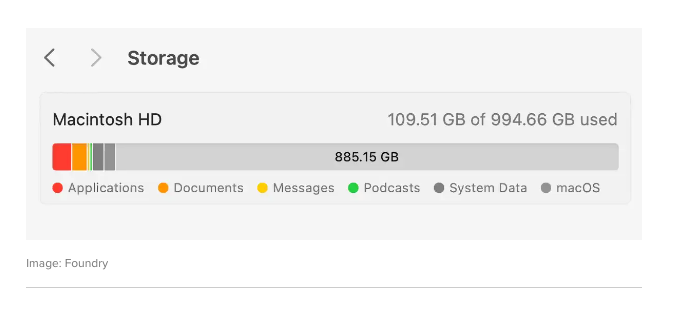
3. About This MacAll versions of Mac OS X include an ‘About This Mac’ section, which can be found under the Apple menu (Apple logo in the top left corner of the screen > About This Mac). Depending on your OS version, you then either need to click on ‘Storage’, or ‘More Info’ > ‘General’ > ‘About’ then scroll down to the ‘Storage’ section. Clicking on the ‘Storage Settings’ button will then show you which files are taking up space on your drive.
4. Disk Utility AppThe final option we will outline today is viewing your free disk space via the Disk Utility app. This is also useful for checking out the available space on any partitioned drives, as well as any external drives you might be using, such as an external hard drive or a USB stick. Open Disk Utility either from your Applications folder (‘Applications’ > ‘Utilities’ > ‘Disk Utility.app’), or by searching for ‘Disk Utility’ in Spotlight, then click on the drive or partition to see the used / available capacity.  Of course, if you find that you are running out of space on your Mac and would like to discuss options for either upgrading your hard drive or your Mac, please contact us for a free no-obligation quote.
This is a question that we get asked a lot, so read on to find out the pros and cons of shutting down your Mac, versus letting it sleep. 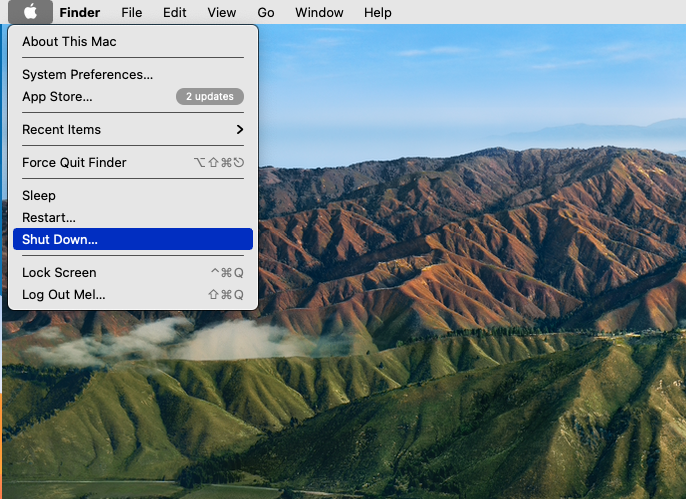 Shutting down your Mac There are three options available to every Mac user when they have finished using their Mac for the day: leave it on, allow it to sleep, or shut it down. Most people don’t just leave their Mac on, primarily because it uses more electricity than allowing it to either sleep or shutting it down, and your data may not be secure. But is it better to allow it to sleep, or to shut it down completely? Over time, apps and processes can clog up your Mac’s RAM (or ‘Unified Memory’ as it’s now called in newer Macs). This can cause your Mac’s performance to drop significantly, especially on older Macs, leading to apps that are slow to open or respond, or a time lag between typing and the characters appearing on the screen, for example. Whilst quitting and relaunching apps, or closing multiple browser tabs can help, the best way to clear out the RAM is to shut down your Mac. It's also important to note that some app updates only come into effect after shutting down and restarting your Mac, so the occasional restart will ensure that everything is working as it should. But how often should you shut down your Mac? Letting your Mac sleep  We’ve discussed the advantages of shutting down your Mac, but what are the advantages of just letting it sleep? The most obvious benefit is that allowing your Mac to just sleep preserves all the open windows and tasks you were previously working on. It will also wake up considerably faster than a Mac that has been turned off. In terms of energy usage, Macs use very little energy when sleeping, and in fact may use more energy shutting down and starting back up again. With the above in mind, if you are using your Mac daily, we would recommend shutting it down completely a few times a week (to refresh the RAM, shut down any processes that are stuck and ensure that any installed updates are applied), and then allowing it to go to sleep for the rest of the time. However, if you are not going to be using your Mac for a day or more, it would be best to shut it down. Mac battery health 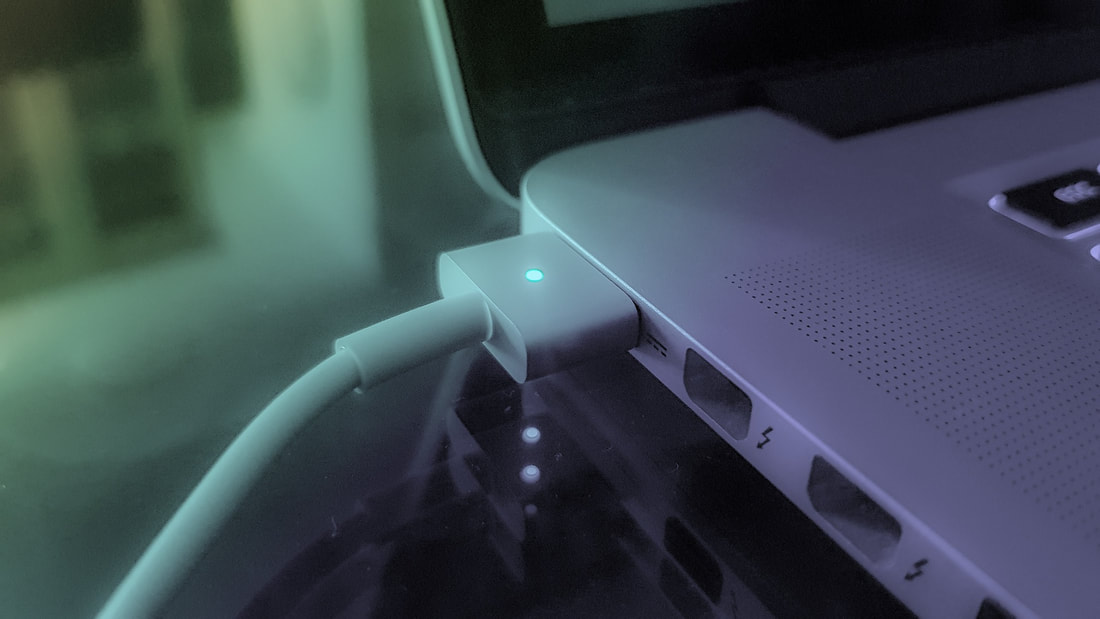 One more important point to note for MacBooks is in relation to battery health. If you are going to be storing your MacBook for an extended period of time without using it, it should neither be left plugged in on 100%, nor allowed to fully discharge to 0%, as this can damage the battery, rendering it incapable of holding a charge. If you have accidentally allowed your Mac’s battery to fully discharge and it doesn’t seem to be charging at all, try leaving it on charge for a long period of time eg all day or night. If you are lucky, it will begin charging again (although the battery’s storage capacity may have been permanently reduced). And if not, contact us regarding the replacement of your laptop battery.
One way to clean up your Mac desktop (without having to do any actual filing!), but still keep your items organised is by using Desktop Stacks. On MacOS, Stacks are groups of files. Not only can Stacks organise the items you already have on your desktop, it will automatically place new items into the relevant Stacks every time you save to your desktop - meaning that your desktop stays organised! Turn on Mac Desktop StacksHere’s how to set up Stacks on your Mac:
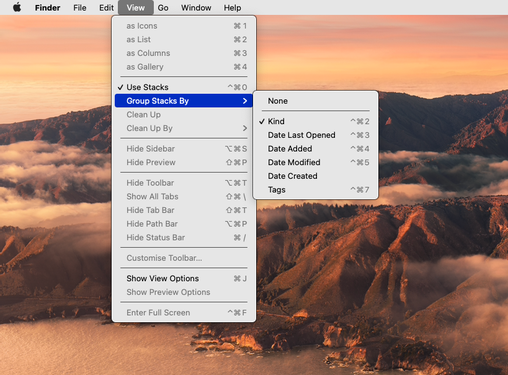
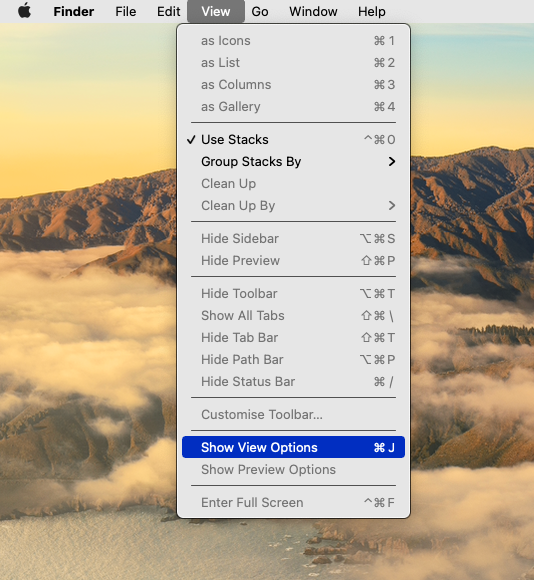
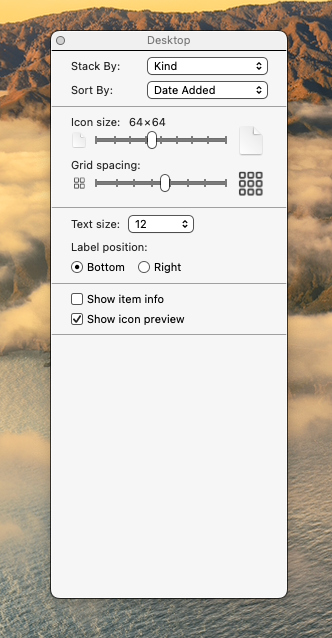
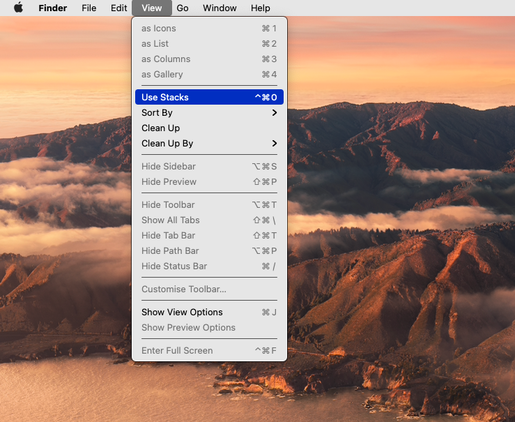 Choose How to Group StacksThe nice thing about using Stacks to stay organised is that you can group them in a way that makes sense to you:
By default, Stacks are organised by Kind, but you can change this as follows:
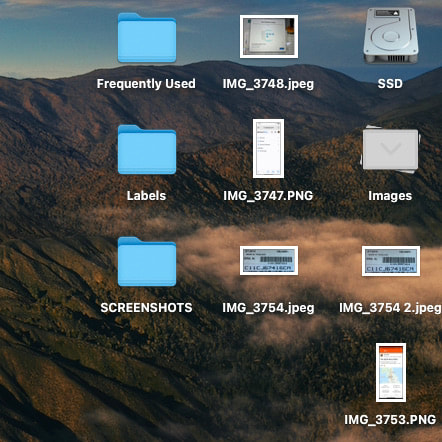
 Browse, Expand and Collapse Stacks Once you have set up Stacks, you can expand the Stack by clicking on it, and then double-clicking to open a file. In the first image below you can see a Stack labelled ‘Images’. To collapse the Stack, click the Arrow (the icon with the ‘Images’ label in the second picture below).
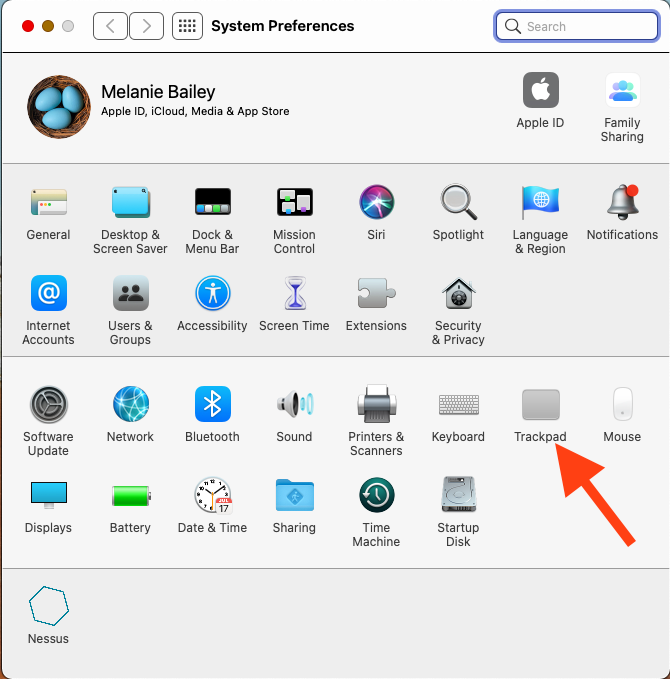
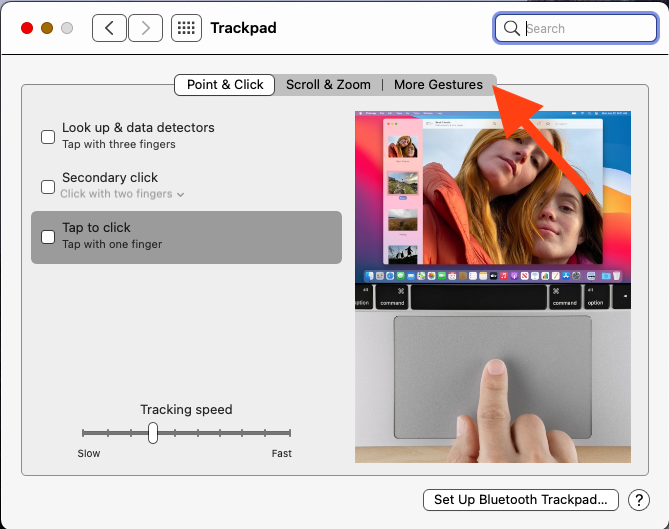
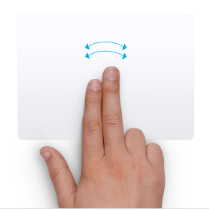 Whilst many MacBook features can improve efficiency, sometimes they can be a bit… well… annoying! One such feature is the ‘swipe to go back’ gesture, which can be a nuisance if it triggers unintentionally, disrupting your workflow or browsing experience. Here we look at a simple way to turn off the ‘swipe to go back’ gesture on a MacBook.
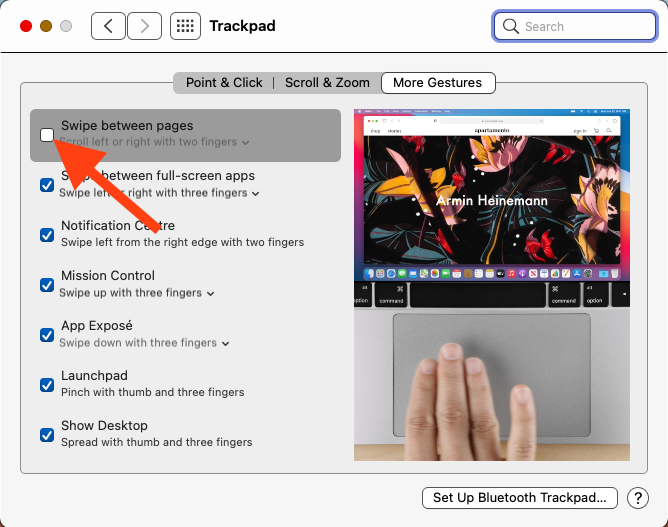 And that’s it! As you’ll see in the ‘More Gestures’ window, there are more gestures to explore (and if you don’t like them, you can just turn them off by unchecking the little boxes).
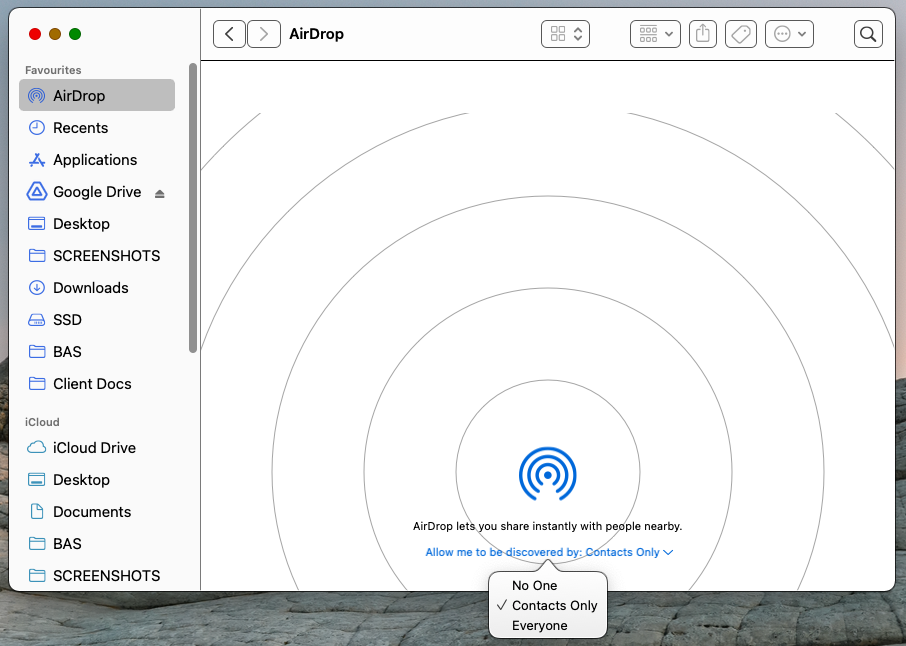
Learn how to use AirDrop to share photos, videos, pictures, files, contacts and web links to an iPhone, iPad or another Mac.  AirDrop uses Bluetooth to create a WiFi network between two Apple devices. It’s a very safe way of transferring data, as the devices sending and receiving the data create a firewall around the connection, ensuring that all files are sent encrypted. And there is no limit to the size of files that can be sent using AirDrop, unlike via email or other applications. To use AirDrop, both devices must be within 9 metres / 30 feet of each other and have AirDrop, Wi-Fi and Bluetooth turned on. Where is AirDrop on Mac and iPhone? That’s not super easy to answer, as AirDrop isn’t available as a standalone app. However, you can access it in several different ways. Turning on AirDrop on a Mac
Turning on AirDrop on an iPhone or iPad
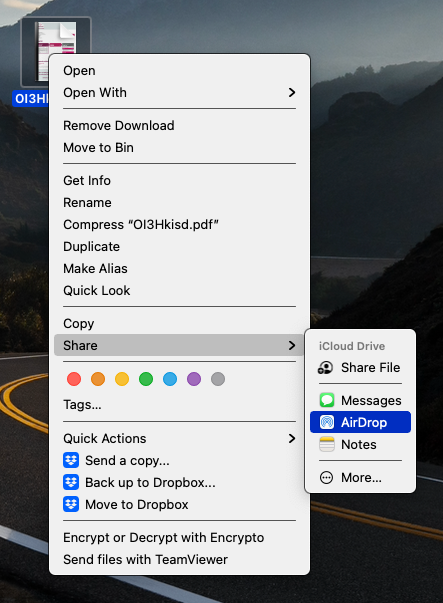
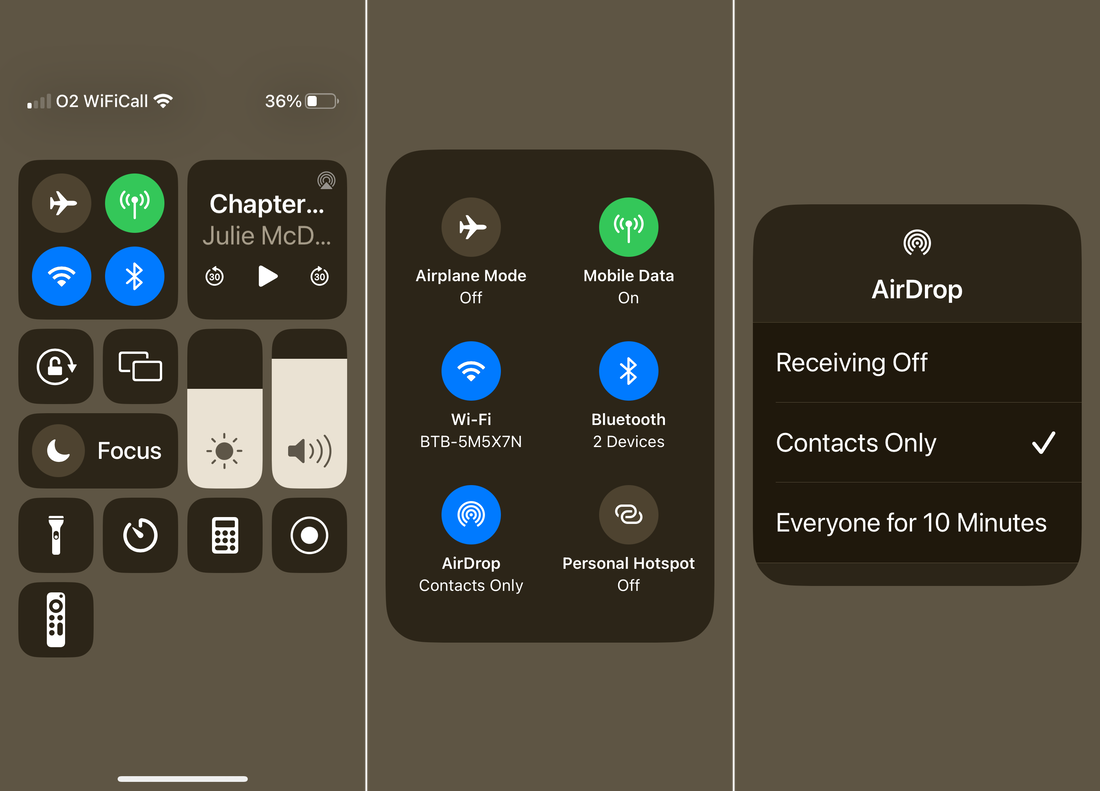 **If you select ‘Everyone’, your AirDrop name will then be visible to all nearby Apple devices, so be mindful of this while in public places. How to AirDrop from Mac to iPhone, iPad or another MacYou can send an item via AirDrop from your desktop, the Finder or from within apps such as Word, Photos or Contacts. Firstly, ensure that the person you want to AirDrop to has their iPhone, iPad or Mac unlocked.
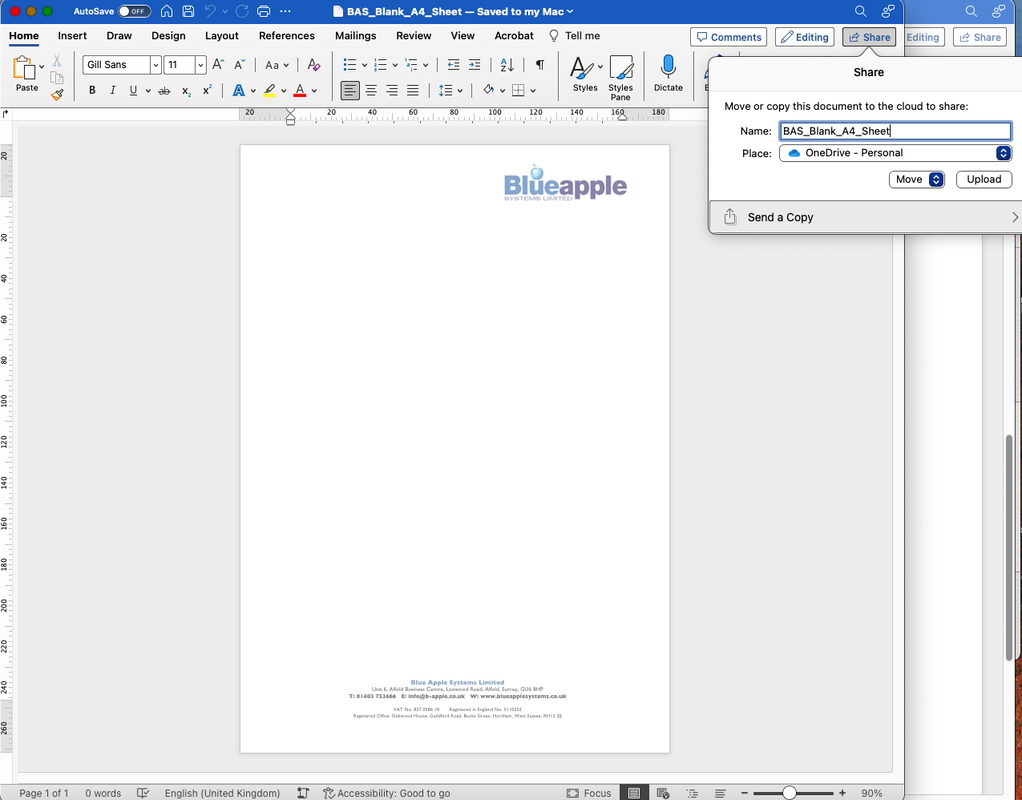
Sending from within Microsoft Word, Excel or PowerPoint:
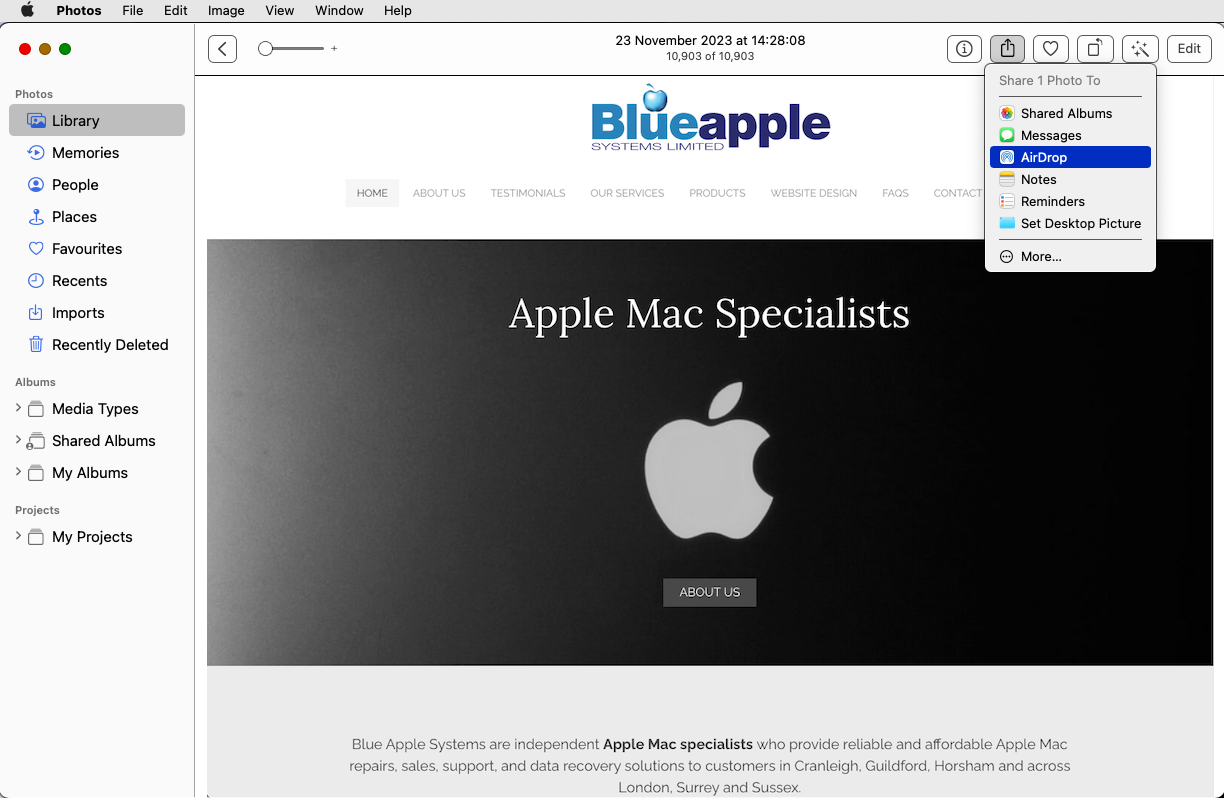
Sending from within the Photos app on Mac:
Where do AirDrop files go to on Mac and iPhone?You’ve accepted a file via AirDrop on your Mac or iPhone/iPad, but where do the files go to?
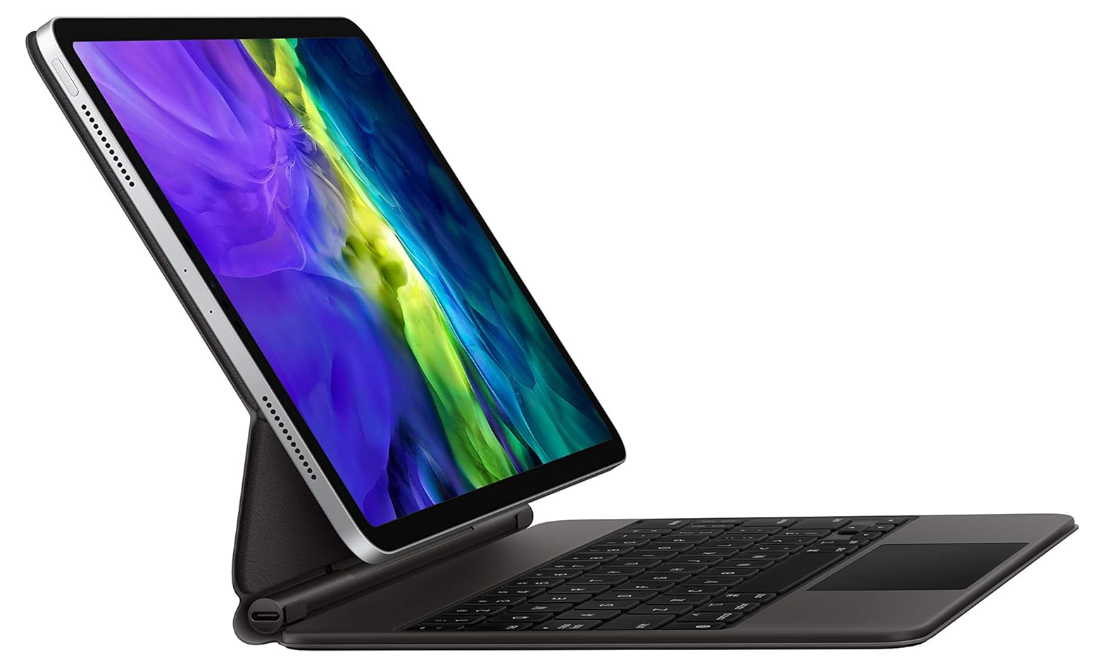
We’ve had a few customers ask us whether they can use an iPad Pro in place of a MacBook Air? And our answer is usually, ‘It depends’. 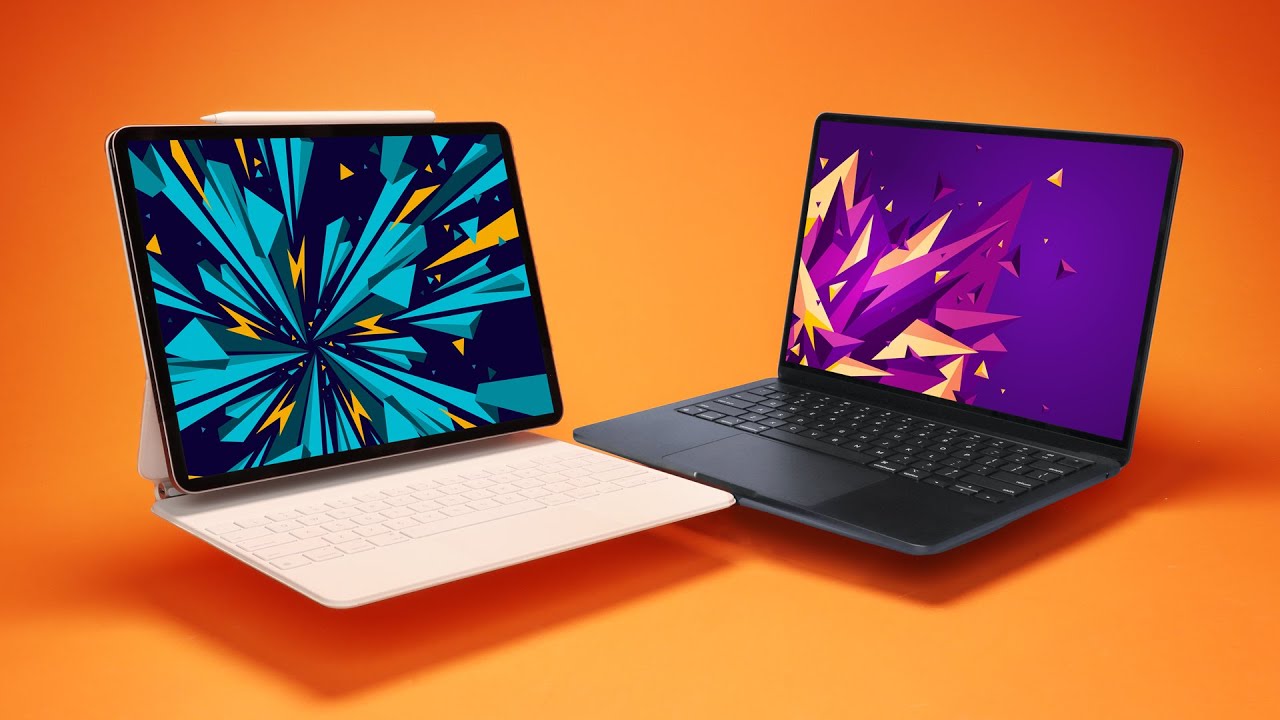 At first glance, the latest iPad Pro and MacBook Air (13 and 15 inch) have a lot in common:
But there are also several differences between them:
Which one you choose depends on what you are looking for and what you are going to use it for. Here we compare some of the main features of each device. DisplayThe main difference here is obvious: the iPad Pro has a touch display. But the superiority of the iPad Pro display doesn’t end there. The brightness of a display is measured in ‘nits’. The MacBook Air’s display has a maximum of 500 nits brightness, whereas the iPad Pro models have 600 nits max brightness, with the 12.9-inch model supporting up to 1000 nits max full-screen brightness and 1600 nits peak brightness for HDR content. Both iPad Pro models also work with the second-generation Apple Pencil, including Apple Pencil hover, a feature that was introduced last year. So, the iPad Pro screens not only have a touch display, but they are brighter than the MacBook Air. If a touch display and / or screen brightness is important to you, or if you are an artist, or someone who prefers taking handwritten digital notes, then the iPad Pro is the winner in this category. Keyboard & StorageOne factor that most people seem to agree upon is that if you are planning to use an iPad Pro in place of a laptop, then you’re going to need to buy a keyboard. The price of keyboards varies hugely, from Apple’s own iPad companion Magic Keyboard, down to cheaper versions which can be sourced from companies like Amazon.
In terms of storage, the 11-inch iPad Pro’s base model comes with 8GB of RAM and 128GB of storage. The MacBook Air M2 base model comes with 8GB RAM and 256GB of SSD storage. If you add the price of an Apple Magic Keyboard to the price of the 11-inch iPad Pro, it costs virtually the same as a MacBook Air, with its inbuilt keyboard and trackpad. But the MacBook Air removes the headache of finding a reasonably priced keyboard, AND you get double the storage capacity. If value for money is your main driver, then the MacBook Air wins out here. Software & AppsAnother major difference between the iPad Pro and the MacBook Air M2 is the operating system, with the iPad Pro running on iPad OS and the MacBook Air running on macOS. The range of apps that are available on the iPad Pro, particularly apps that demand higher levels of RAM (such as Final Cut Pro X or Logic Pro X) is less than for the MacBook Air, although they both run Microsoft Office (if you use the free versions of the iPad apps you can see your Word, Excel and Powerpoint documents, but you’ll need an Office 365 subscription to edit and create new documents). Apps such as Garage Band and iMovie run pared-down versions on the iPad. Furthermore, M2 Macs can now run iPadOS apps, but iPads can’t run some macOS apps.
If you need the full version of any particularly RAM-hungry apps, such as the ones mentioned above, then the MacBook Air is the one for you ConnectivityOne very specific advantage of the iPad Pro is its cellular connectivity option. With the addition of a SIM card, you can take the iPad Pro on the train for example, and with a 4G or 5G connection you’ll be able to work, stream music, videos or play games without the need to connect to the hotspot on your iPhone. In terms of physical ports, the MacBook Air has more than the iPad Pro: two USB Thunderbolt 4 ports and a 3.5mm audio jack, vs only one Thunderbolt 4 port on the iPad Pro. This means that you can charge the MacBook Air whilst also plugging in another device, whereas with the iPad Pro the only way you can achieve this is to purchase a separate Thunderbolt dock. If you like to take a device out and about (one that has a larger screen than your iPhone), don’t want the hassle of connecting to a hotspot and don’t generally need to connect other devices, then the iPad Pro is going to be best suited to your needs Battery LifeThere’s no getting away from it, the MacBook Air has a substantially longer battery life than the iPad Pro – 50% longer in fact (15 hours for the MacBook Air vs 10 hours for the iPad Pro – which reduces to 9 hours if you get one of the cellular models). So, if battery life is a top consideration for you, the MacBook Air is a clear winner. Which One is Right for Me?Overall, the better device is the MacBook Air: you simply get more for your money – more storage, more ports, more high-end apps, a built-in keyboard / trackpad and a longer battery life.
The iPad Pro serves more of a niche market, but if a touchscreen and cellular connectivity are non-negotiables for you, then it’s an obvious choice. Just be aware that, if you also purchase a keyboard and thunderbolt dock, it may end up costing you more than a MacBook Air. 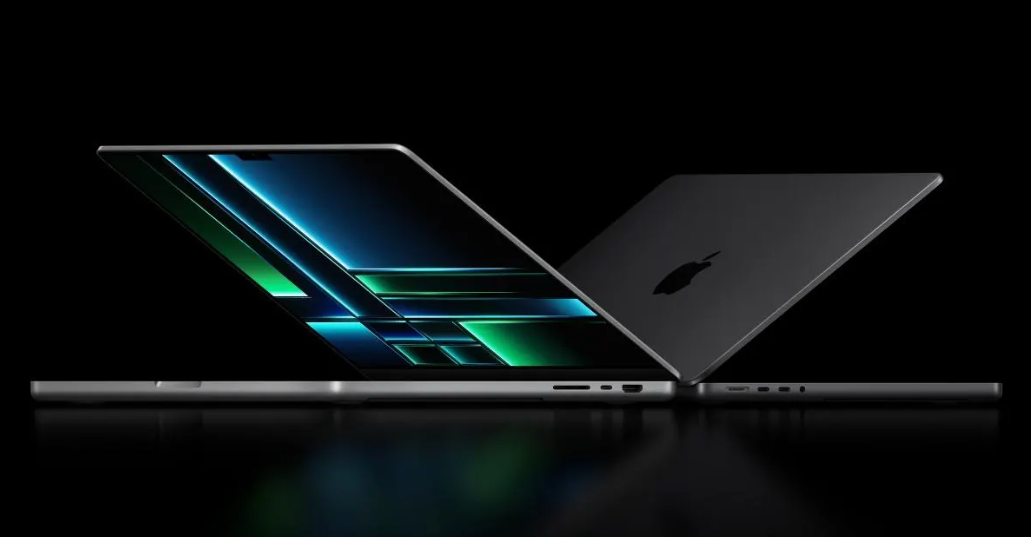 APPLE You’ve decided that you want to buy a Mac, not a PC. And you’ve worked out that a desktop is not for you. So that leaves you with the choice of a MacBook Air or a MacBook Pro. But how do you narrow down your choice further? Here we concentrate on the most recent MacBook designs, namely the M2 13 and 15-inch MacBook Airs and the M2 14 and 16-inch MacBook Pros. Read on to find out more… The Similarities
The Differences
Which Should I Choose - MacBook Air or MacBook Pro?For the majority of Mac users, the M2 MacBook Air is a great option, due to the combination of features, fast performance, a slimmer, lighter and highly portable design, and of course lower price than the MacBook Pro.
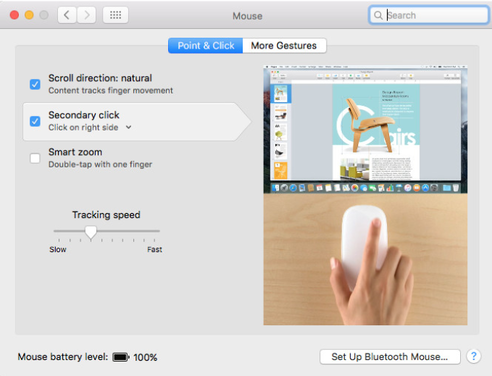
If, however, you need a larger and more accurate display, more memory and storage, more ports and the advanced features and very high level of performance required by more power-hungry apps (e.g. for graphic design or video editing), then look to the high-end MacBook Pros. Of course, if you would like some advice with regards to your own personal situation, we would be happy to help you assess your requirements and talk you through all the current options available to you. Please call Richard on 01403 753666. If you’ve used a PC in the past, right clicking was as simple as clicking the right-hand button on your mouse or trackpad. But on a Mac, right clicking can cause some confusion. Let’s simplify things a little with the 3 most popular ways to right click on a Mac. 1. Control + Click 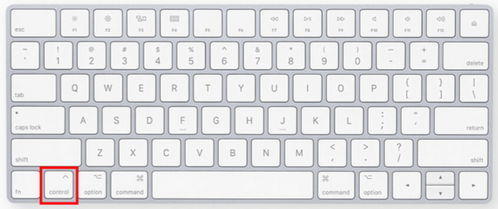 The most straightforward way to right click on a Mac, and the method that most Mac users are aware of, is by pressing the Control (ctrl) key whilst pressing on the trackpad or mouse button. 2. Right Click on a Magic Mouse  Apple’s Magic Mouse doesn’t have any actual buttons on it like a PC mouse does. However, that doesn’t mean that you can’t right click on a Magic Mouse. You simply need to click towards the right of the mouse. If this doesn’t work, check your settings in System Preferences:
 3. Using Two Fingers on a Trackpad 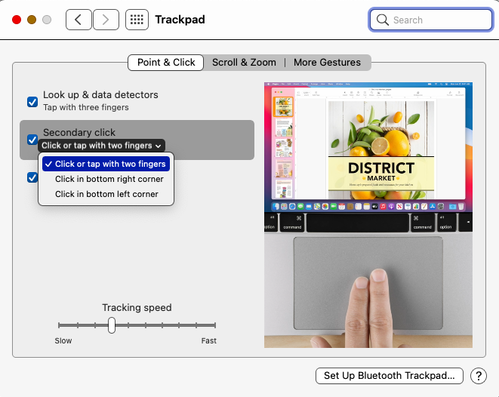 If you’re using a MacBook with a trackpad, there’s a third way to double click: clicking with 2 fingers simultaneously on the trackpad. You may need to set this up in Systems Preferences before it will work for you:
There are a few other ways to right click on a Mac, but these are the three most straightforward methods to get you started. Happy right clicking!
Screenshots on your Mac are automatically saved to your Desktop by default. However, if you tend to take a lot of screenshots, this can quickly lead to your Desktop becoming cluttered. But did you know that you can change the location your screenshots are saved to? Read on to find out more. 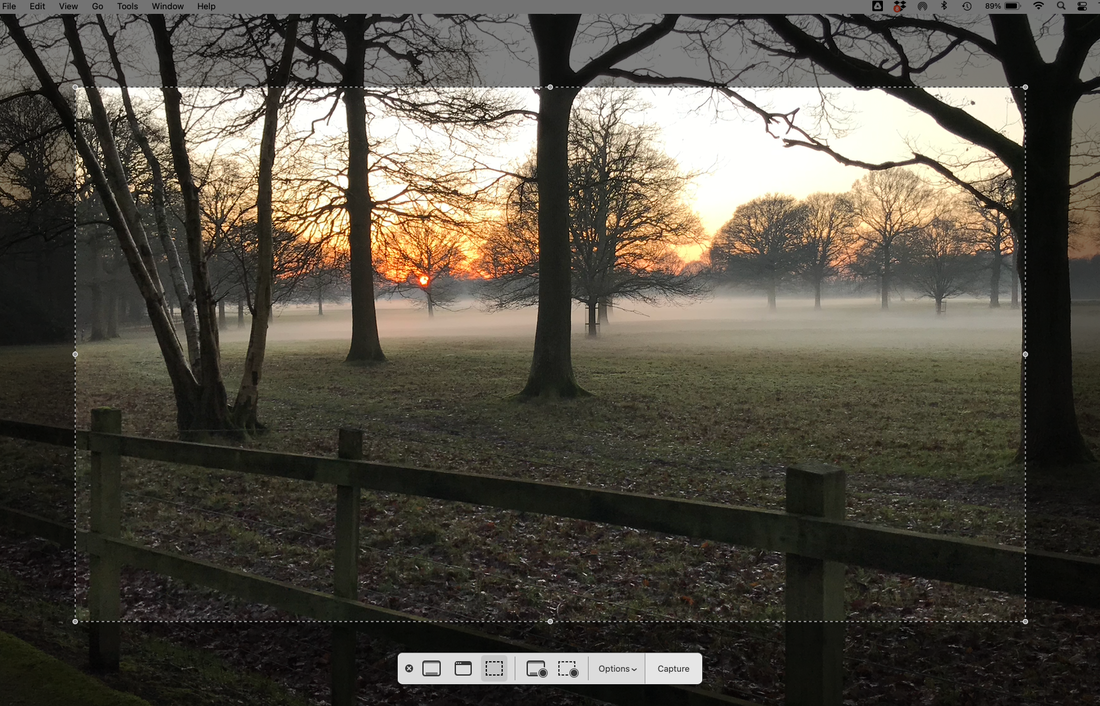
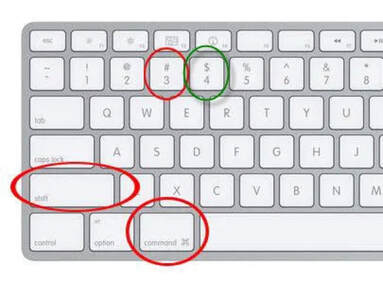
Changing Screenshot Location in macOS Mojave or Later If you are using macOS: - Ventura - Monterey - Big Sur - Catalina, or - Mojave …you can use the Screenshot app to change the default save location for your screenshots. To open the Screenshot app, go to ‘Applications’ > ‘Utilities’ > Screenshot.app’. Alternatively, you can press ‘Shift’ + ‘Command’ +’5’, or press ‘Command’ + ‘Spacebar’ and type ‘Screenshot’ into the search bar that appears. You will then see a screenshot toolbar at the bottom of the window that appears. 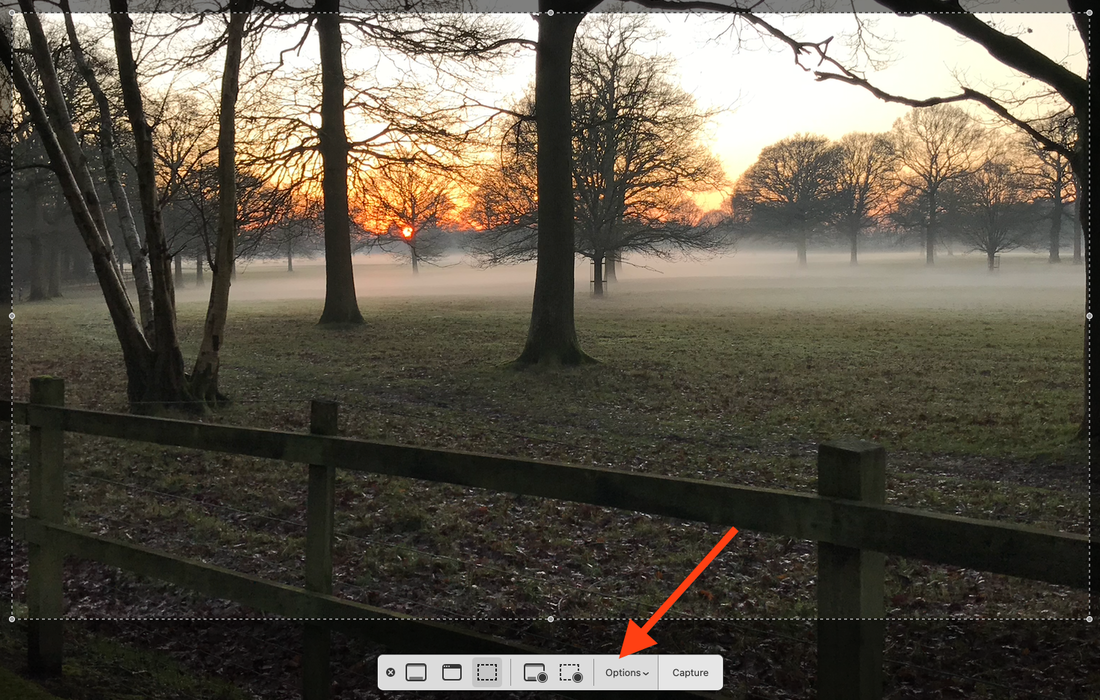 In this toolbar, click on ‘Options’ (second from the right). This will present you with a list of locations to choose from. If the location you would prefer is not in this list, select ‘Other Location’. You can now select a new location, including creating a specific folder for your screenshots. All new screenshots will now be saved to this location. 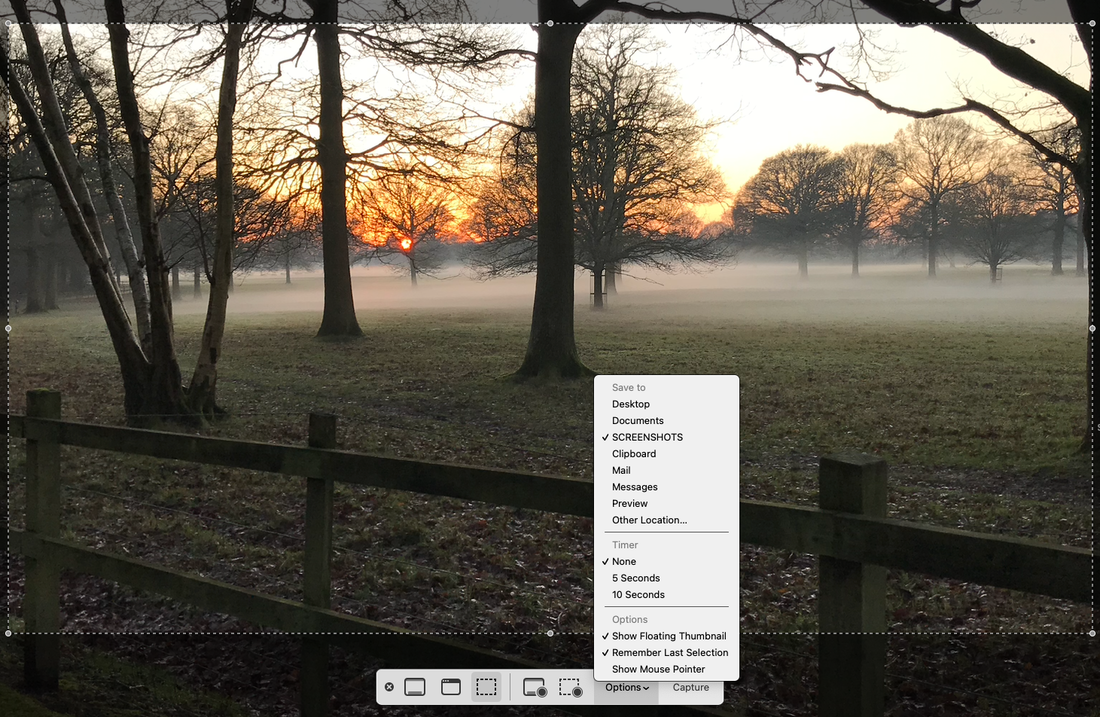 Changing Screenshot Location in macOS High Sierra or Earlier If you are using: - macOS High Sierra - macOS Sierra - OS X El Capitan - OS X Yosemite - OS X Mavericks - or earlier …changing the default save location for screenshots is a bit more complicated, as you need to use Terminal. First, create a new folder on your Mac wherever you’d like to save your screenshots. Then open Terminal; the easiest way to do this is to use Spotlight. Click on the little magnifying glass icon in the top right-hand corner of the screen and type ‘Terminal’ into the search box. Then double-click on the Terminal app icon. 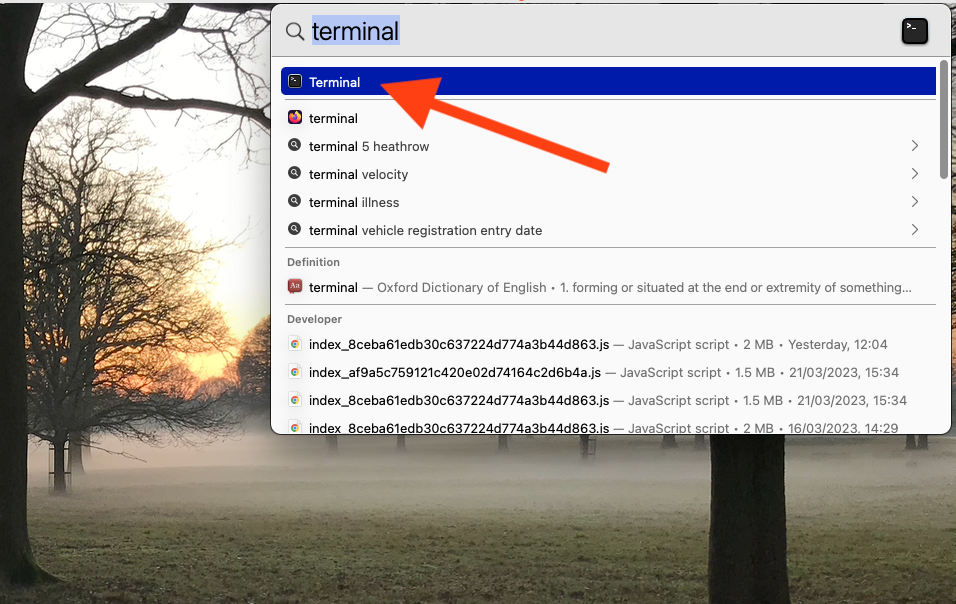 In Terminal, write the command: defaults write com.apple.screencapture location It is important that you leave a space after the word ‘location’ before adding the following step. Drag and drop the folder you created earlier into the Terminal window (the folder’s location will appear in Terminal next to the command you have just written). Then press ‘Enter’. Finally, still in Terminal, type: killall SystemUIServer then press ‘Enter’ again. All new screenshots will now be saved to the folder you created. IMPORTANT! Important: do NOT delete the folder you created to save your screenshots to without first changing the save location in Terminal. To do this, follow the above procedure, but instead of ‘location’ and then dragging the new folder, type ‘~/Desktop’, like this: defaults write com.apple.screencapture ~/Desktop |


 RSS Feed

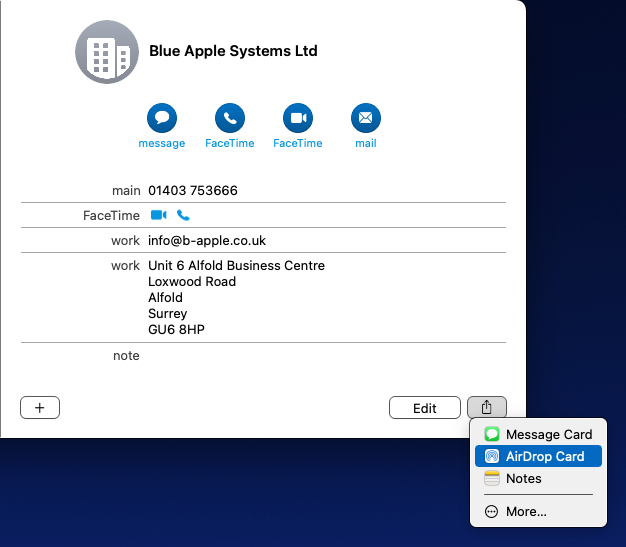
Blue Apple Systems Ltd
Unit 6 Alfold Business Centre Loxwood Road, Alfold Surrey, GU6 8HP 01403 753666. |
Blue Apple Systems Limited is authorised and regulated by the Financial Conduct Authority. Blue Apple Systems Limited is not a lender, but a licensed credit broker, licensed to introduce borrowers and lenders
for the purposes of entering into short-term leasing agreements. Blue Apple Systems Limited does not charge customers a fee for using its broker services, but receives a 1.5% to 2% commission from lenders if a customer enters into a consumer credit agreement with a lender following introduction. © Blue Apple Systems Ltd 2015. All Rights Reserved. Blue Apple Systems Ltd is registered in the UK. Company registration number 05110252. VAT No 827058618. All prices are subject to VAT at the current rate of 20%. |