
|
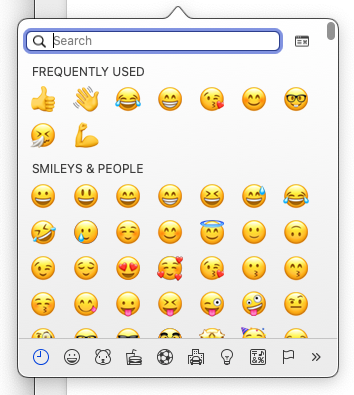
You have probably seen symbols such as € and # on your keyboard, but you may have wondered how you’re supposed to type them? We have the answers for you here! The layout of your keyboard may depend on where you are in the world. A UK keyboard differs from a US keyboard, for example. And to confuse things further, some Mac keyboards label the key third along from the left on the bottom row either ‘Option’ or ‘Alt'. Rest assured they are one and the same! 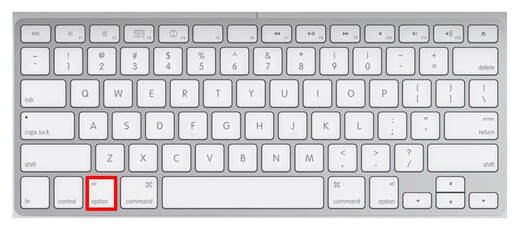 So now that we know where to find the 'Alt' or 'Option' key, let's take a look at some ‘special characters’ and how to type them:
Finally, did you know that you can type Emoji on your Mac, not just on your iPhone and iPad? To access the Emoji from your Mac keyboard, press:
0 Comments
If you have two-factor authentication enabled on your Apple ID account, you may have noticed that it doesn’t always show the correct location when you attempt to sign in. So why is this happening, and is it safe to click ‘Allow’? Read on to find out more… 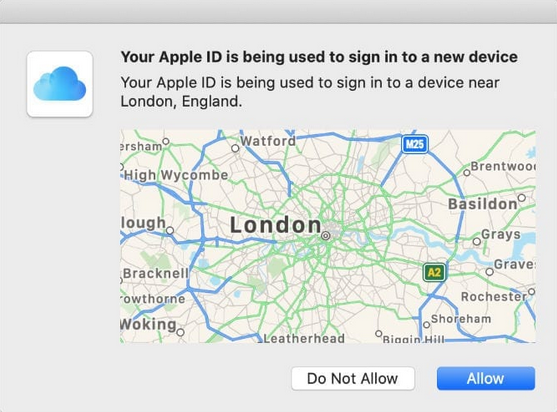 What is two-factor authentication? Two-factor authentication is an advanced security measure for your Apple ID account. It sends a message to your other Apple devices, showing a map with the origin of the sign-in attempt. If you click ‘Allow’, it will then present a six-digit code to be entered on the requesting device. Without this unique code, it will not be possible to sign in. 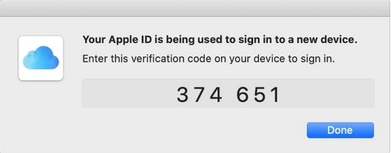 Why does two-factor authentication show the wrong location? However, this map frequently shows the wrong location, often hundreds of miles away from where the request was made! But why? This is because, unlike the Maps app on your iPhone or Mac, two-factor authentication doesn’t use Location Services to work out where the sign-in attempt came from. Rather, it uses your IP address. What is an IP address? An IP address (or ‘Internet Protocol’) is a unique series of numbers that identifies a device on the internet or a local network. A bit like your postal address shows people where to send a letter, your IP address shows other computers where to send your emails, data, etc. However, the location of the IP address depends on its internet server. You may be working on your Mac in Cardiff, but the internet server that hosts your IP address may be located in London. So that’s the location that you are going to see on the little map. So how do I know if it's safe to click 'Allow'? Of course, you still need to be wary of other people trying to gain access to your account. If you want to delve a little deeper, you can find out the location of your IP address by visiting iplocation.net.
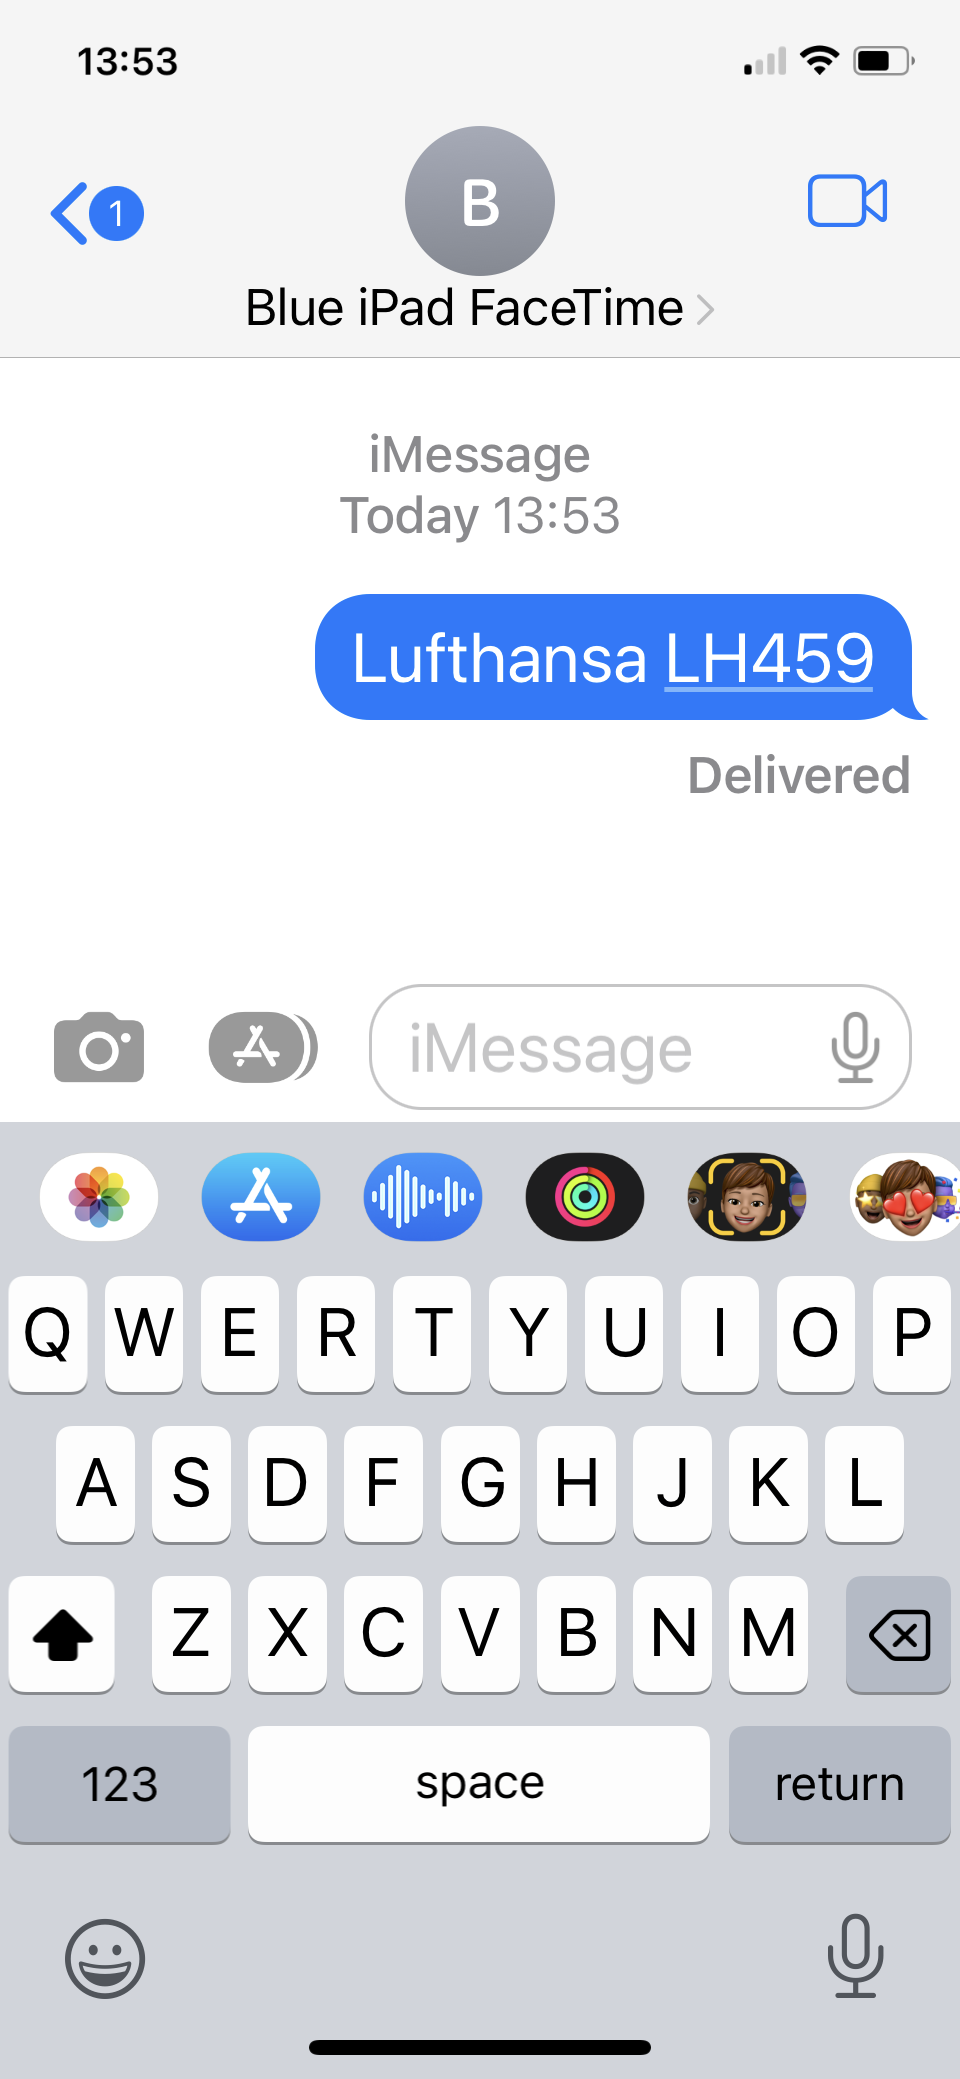
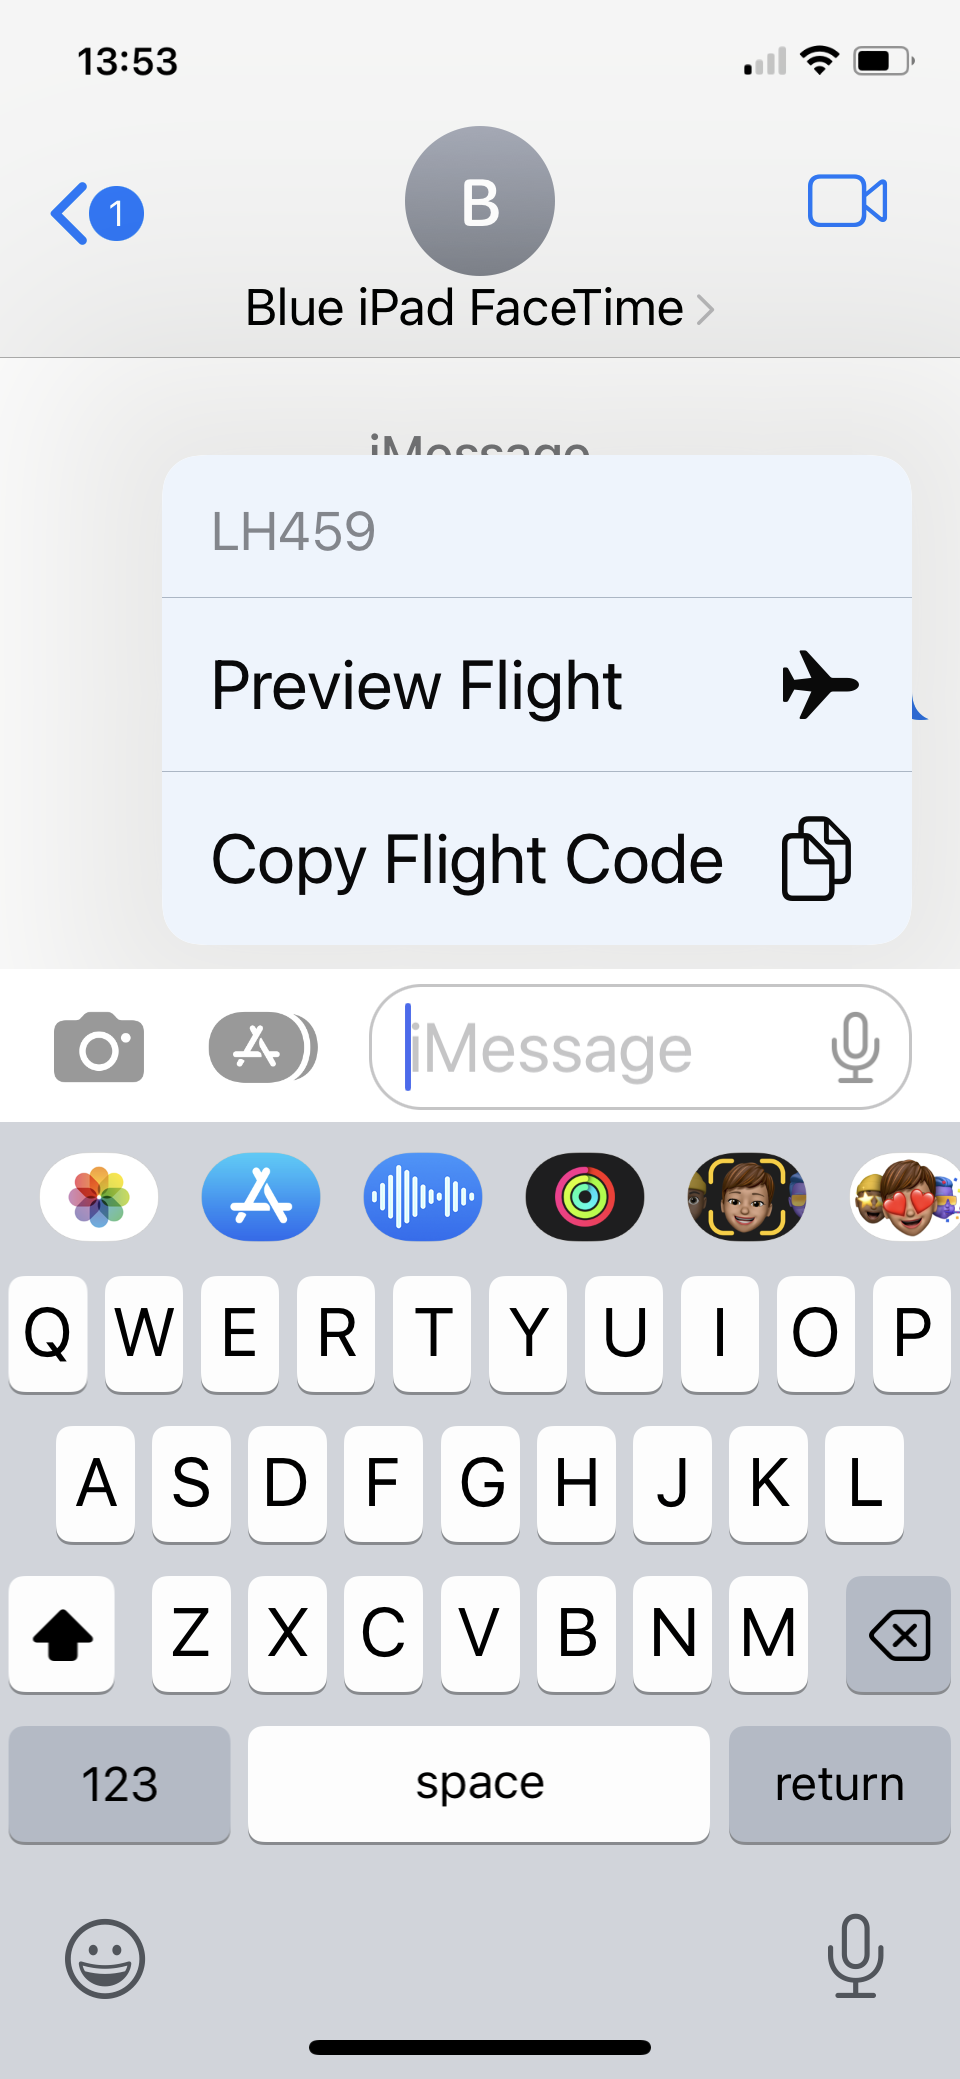
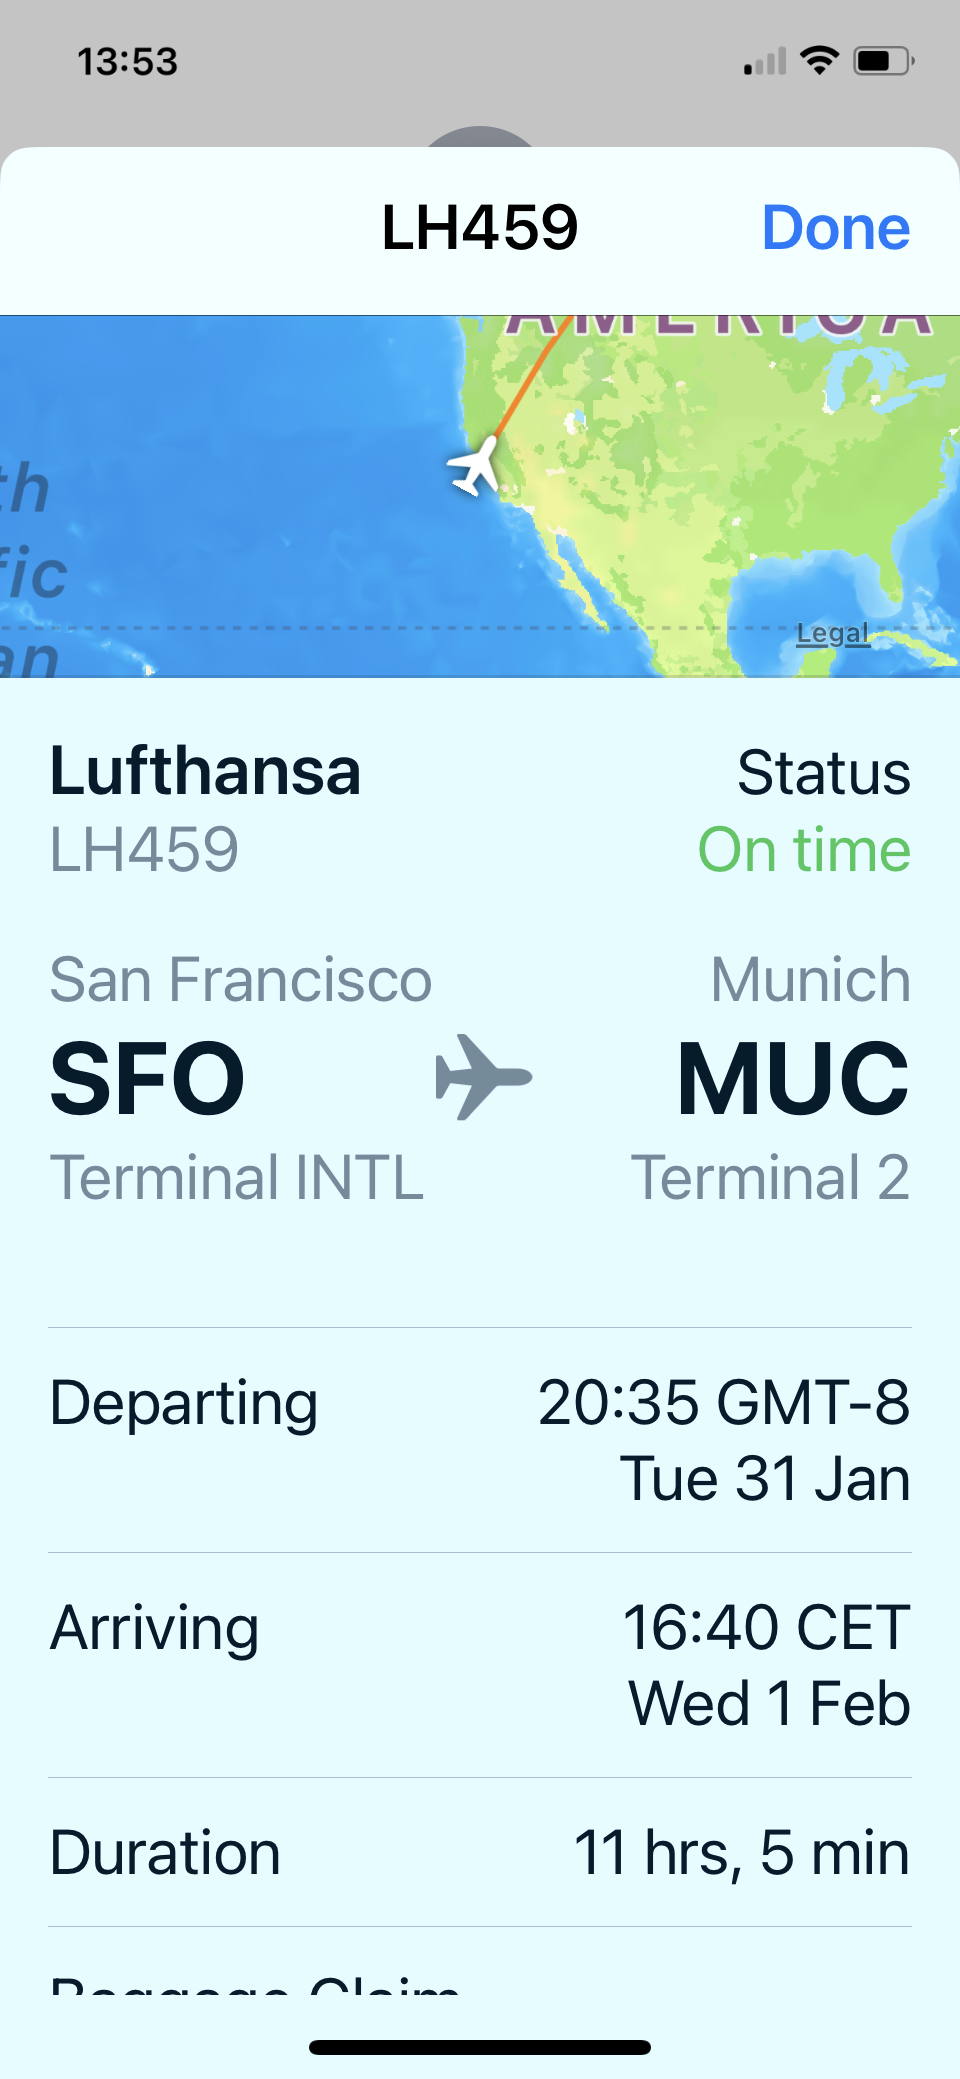
However, if you’re signing in to Apple ID or iCloud when the alert pops up, it’s usually safe to allow access. Flight tracker apps have become a popular way to keep track of flights, including take off/arrival times and even those dreaded delays! But you may not know that if you have an iPhone or a Mac, you don’t actually need a third-party app to track a flight, as this handy feature is already built-in to the operating systems. Read on to find out more…  For several years now Apple has been integrating data detectors into its iOS and macOS systems, which can recognise things like dates, times and addresses and turn them into tappable links. Tracking Flights in Messages If someone sends you a flight number in Messages (e.g. Lufthansa LH459), tap on the underlined number and a sub-menu should pop up with the option to ‘Preview Flight’. Click on this and you’ll see a summary of the flight’s progress, airports, whether it’s on time, departure and arrival times, flight duration etc. Tip: To increase the chances of iOS detecting the flight number, try where possible to include the name of the airline in addition to the number.
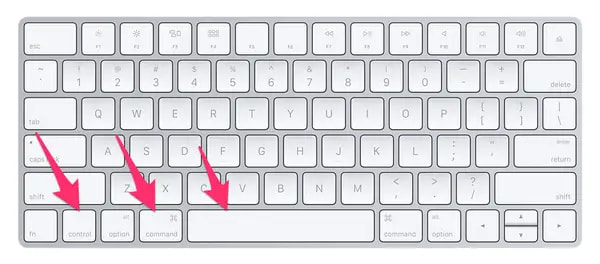
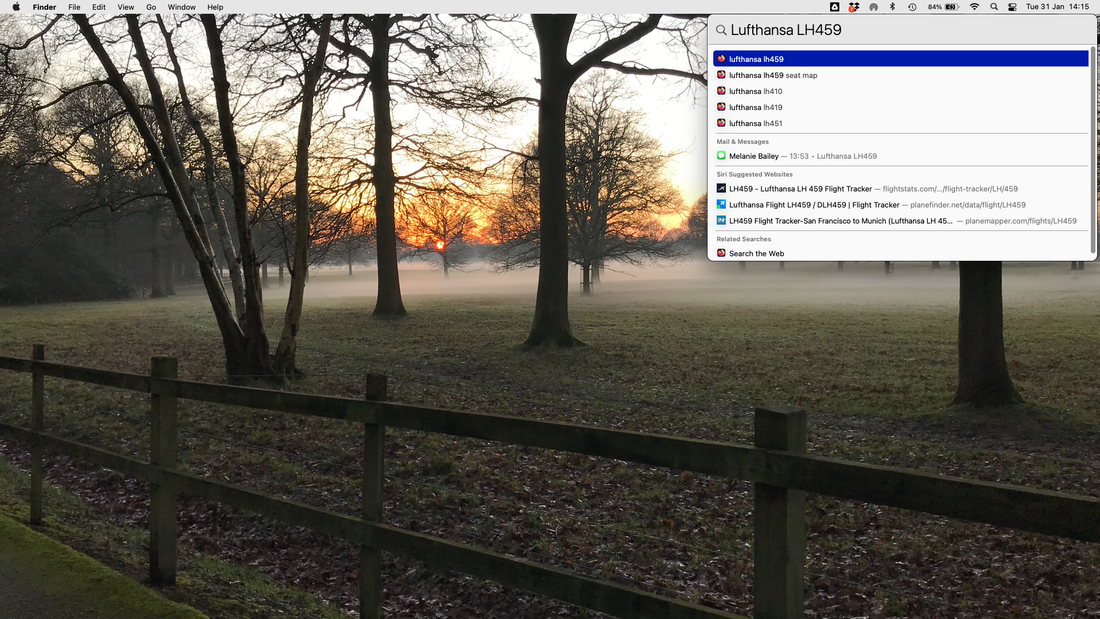
Tracking Flights on a Mac The same data detectors are included in macOS, so you can also track flights on your Mac, using Spotlight. To open Spotlight, either click on the little magnifying glass icon in the Menu Bar at the top right-hand corner of your screen (see first image below), or click ‘cmd’ and the spacebar together. Then type the flight number into the Spotlight search bar and click on one of the results to find out more information.
And that’s all there is to it – happy flight tracking!
If you are looking at buying or selling a Mac that is less than two years old, you need to be aware of Apple’s Activation Lock, otherwise you may inadvertently end up with a Mac that cannot be used. Read on to find out more. Apple Macs are renowned for their security measures. If your Mac is stolen, it’s very difficult for the thief to bypass the inbuilt security measures, so long as you have taken advantage of the tools at your disposal to secure your machine. However, these same tools can consign a Mac to the scrapheap if you don’t fully understand them. According to Apple, with Activation Lock: “…your Apple ID password or device passcode is required before anyone can turn off Find My, erase your Mac, or reactivate and use your Mac. Even if you erase your Mac remotely, Activation Lock can continue to deter others from reactivating your Mac without your permission. All you need to do is keep Find My turned on and remember your Apple ID and password.” The flip side of this is that if a Mac is sold without Activation Lock first being disabled, it will still be associated with the previous Apple ID, and the new owner won’t be able to gain access, even if it has been erased… essentially rendering the machine useless. A recent Tweet by an American independent computer repair specialist, John Bumstead, complains of the “millions” of Macs that have been “condemned… to death” due to Apple’s Activation Lock. 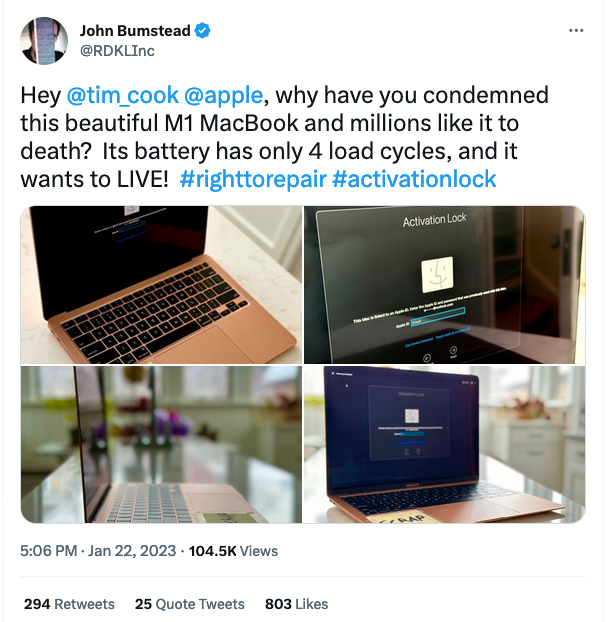 If you are buying or selling such a device second-hand, you need to make sure that the Apple ID has been correctly disassociated from it. You CANNOT just wipe the drive and reinstall the operating system; you must also disable Find My Mac and Activation Lock. This means that if you are buying a second-hand Mac, check with the seller that they have followed the correct procedures, and that you are able to contact them for their Apple ID info if Activation Lock kicks in. If you would like any further information about this topic or would like some assistance with preparing your Mac for resale, contact us.
Blue Apple Systems sells both new and second-hand Macs. However, we only sell second-hand Macs that we have supplied from new and have been correctly prepared for sale. Before selling your Mac or handing it over to a family member or friend, you may be surprised to know that just logging out of your Apple ID or clicking ‘erase’ may not be sufficient! Read on to discover the 9 (or if you’re lucky, just 2!) steps you should take. 
Congratulations! You have now completed the steps necessary to leave your old Mac in an ‘out-of-the-box’ state, ready for its new owner.
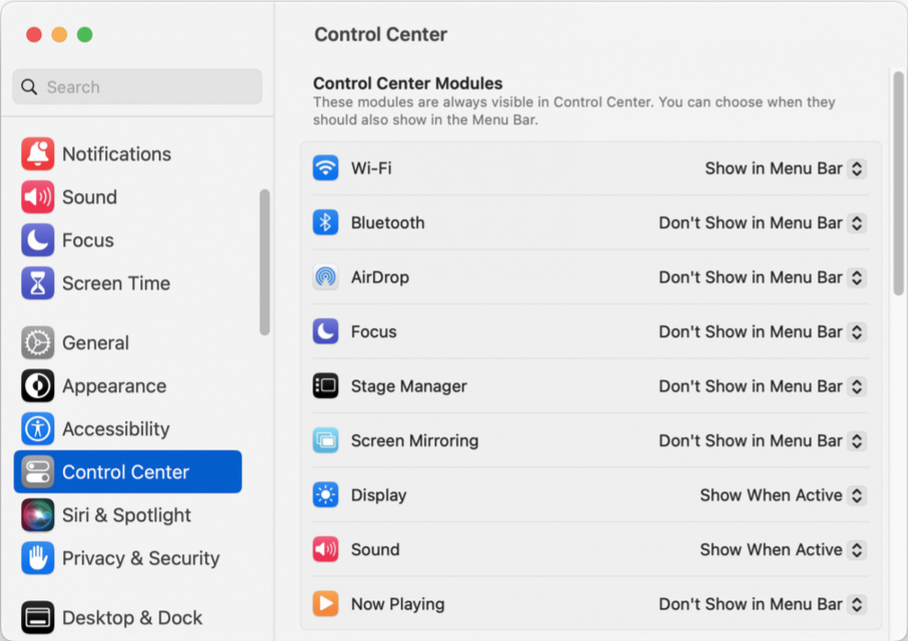
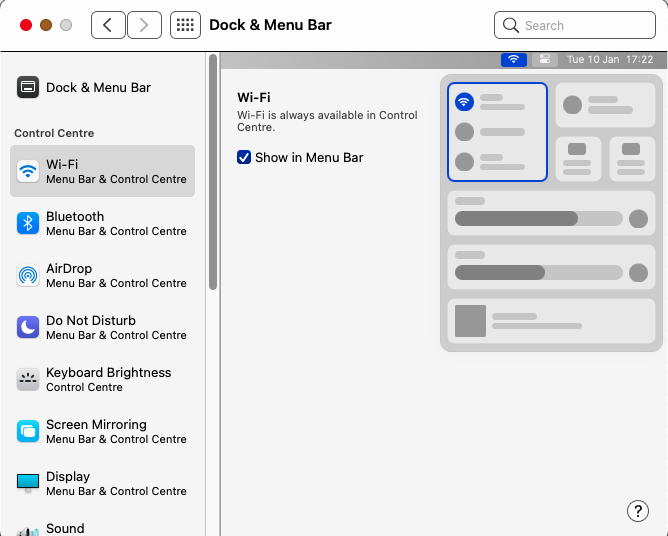
However, if this all sounds a bit too complicated, or you’d just prefer that someone else does it for you, please contact us at Blue Apple Systems and we will be happy to help. The Menu Bar along the top of your Mac screen can show system icons for a multitude of features and functions, such as battery status, date/time and Wi-Fi signal strength. But did you know that you can easily customise what is shown in the menu bar? Read our latest blog to find out how. 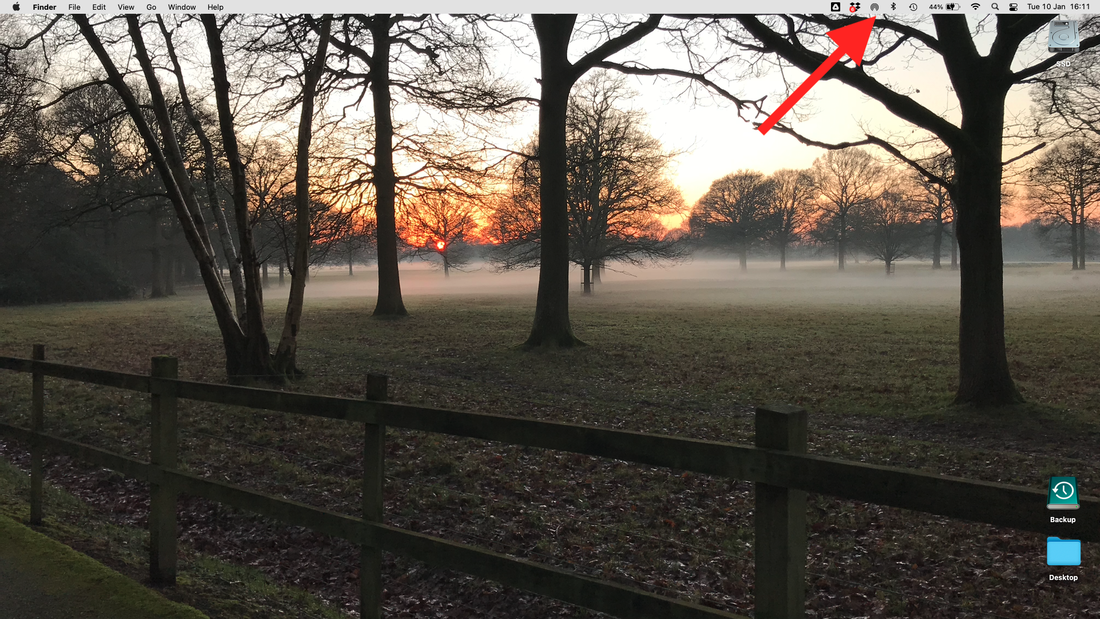 Rearranging Icons in Your macOS Menu Bar Moving icons around on the Menu Bar is super-simple! Some of the icons, such as the date/time and Control Centre, are locked in place, but others can be easily moved around. Simply hold down the ‘cmd’ key (the key to the left of your space bar), click on an icon, and then drag and drop along the Menu Bar to the location you would like it to live. Removing Icons from Your macOS Menu Bar Removing an icon from your Menu Bar is also simple. Hold down the ‘cmd’ key, click on the icon and then drag it downwards away from the Menu Bar. An ‘X’ will appear – let go of the icon and it will disappear. Note: you haven’t deleted the actual feature/function, just removed the shortcut from the Menu Bar. Adding Icons to Your macOS Menu Bar You can also add new items to your Menu Bar. IMHO the best way to do this is from the Control Centre in System Preferences (as it gives you more options to add than via the Control Centre icon in the Menu Bar). Go to System Preferences > Control Centre (in older macOS versions, go to System Preferences > Dock and Menu Bar). Down the left-hand side of the window that opens up, you will see a list of all the Modules available to you. To the right of this list is a menu that lets you select where and when the option will appear. The settings available are ‘Show in Menu Bar’, ‘Don’t Show in Menu Bar’ (or check/uncheck a tick box in older macOS versions) and, for some, ‘Show when active’.
If you have any questions about this, or any other Mac-related queries, please call Richard on 01403 753666 and he will be happy to help.
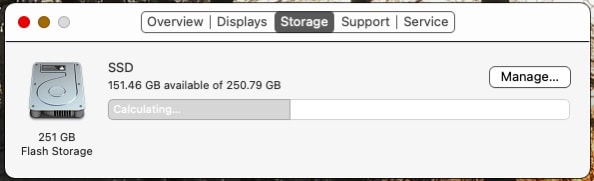
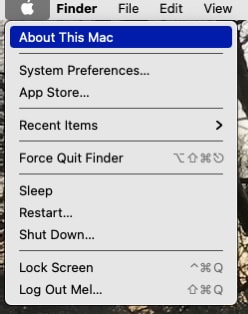
We all start to slow down a little as we age, and your Mac is no exception. But there are things that can be done to help give your Mac more oomph! Read on to find out more. 1. You’re running low on memory (RAM) We are all busy people, and multi-tasking is now par for the course. As a result, it is common to have lots of different apps open on our Macs at the same time (often without even realising it). Whilst you are working on a Word document, for instance, your Mac may also be checking for emails, streaming music, refreshing the multitude of browser tabs that you have open, and remaining connected to any number of social media apps… This all uses memory (RAM) and can slow your Mac down if you are doing too much at once. Another culprit can be using professional apps on a Mac that isn’t powerful enough (e.g. Photoshop, Adobe CC, Final Cut Pro, CAD or Logic Pro). In these instances, it is worth checking whether the Mac you are using meets the recommended system requirements. Options: the quickest win is to get into the habit of closing apps once you have finished using them; an alternative may be to upgrade your RAM (but this is no longer possible on all Macs, particularly newer ones), or to use a more powerful Mac if you are running professional apps.  How many apps?! 2. You’re running out of storage Your Mac stores the apps and information it uses on an internal storage device called a hard drive (HD). If this HD starts to get too full (e.g. if you have less than 10GB space available), there may not be enough free space for your Mac to run properly. If you click on the Apple icon in the top left-hand corner of your screen, then click on ‘About This Mac’, and then ‘Storage’, you can see how much space is currently left available. 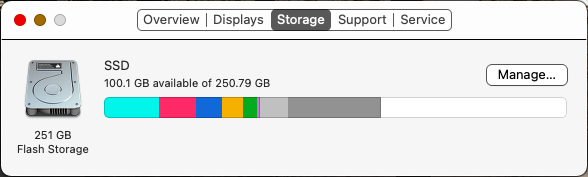 Options: in the above ‘Storage’ window, if you click on ‘Manage’, recommendations will be presented to you to help you manage your storage (e.g. storing files, photos and messages in iCloud / ‘optimising’ storage by automatically removing downloads after watching them / emptying your bin automatically etc). However, the most effective way to increase the available storage (aside from moving files and photos to iCloud) is to manually sort through your Mac and delete any files or apps that you no longer need. 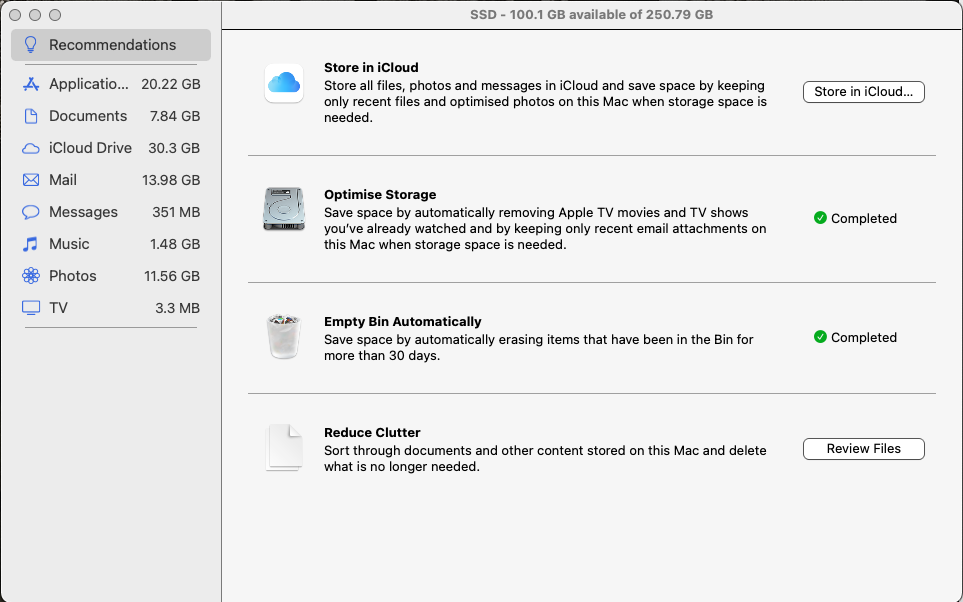
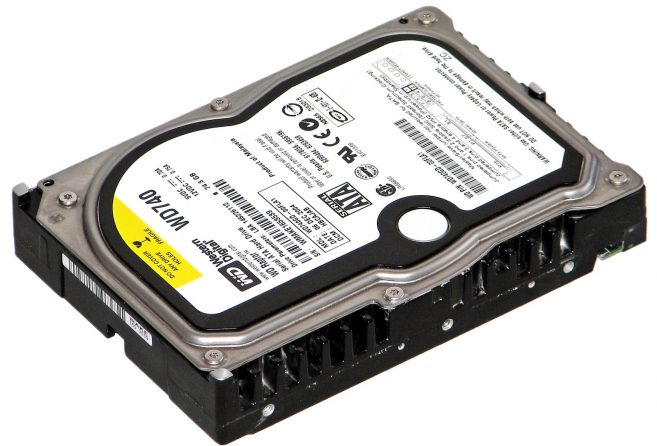
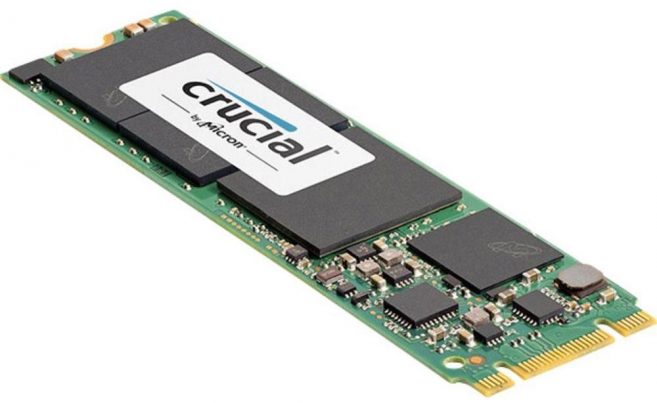
Swapping out your old hard drive for a new SSD drive for your Mac will make an immediate impact. Apps will launch faster, files will save quicker, and multitasking will be a much smoother experience. It results in 5X better performance and is considerably cheaper than buying a new Mac! Options: if your HD is getting old, you can either replace it with another standard HD, or a new faster, lighter and quieter SSD. Alternatively, if the rest of your Mac is also getting old and you have the available budget, you may decide to buy a new Mac. If you would like to discuss why your Mac may be running slow in more detail, please contact Richard on 01403 753666 or info@b-apple.co.uk, and we would be happy to help.
 Nothing, as they say, lasts forever – and that includes your MacBook’s battery. Every time you use or charge your laptop, it suffers a level of battery degradation and has an impact on the battery’s lifespan. However, there are a few things that you can do (and perhaps more importantly, should NOT do!) to keep your MacBook’s battery healthy and increase its lifespan. Read on to find out more…
Charging We get it – a MacBook is a portable computer, not a desktop, and often spends a proportion of its life on the move. That means that when you get it back to the office or home, you want to put it on charge… and then possibly leave it there until the next time you pick it up and whisk it off on its next little adventure! But that can be a problem for your MacBook’s battery. Leaving your MacBook on charge for long periods of time (overnight, or for 8 or more hours when not in use) can negatively affect its battery’s lifespan. An alternative scenario is those of us who have our MacBook set up in a similar way to an iMac, only occasionally taking it off our desks. In this case it is even easier to just leave your MacBook on charge. This is even worse, and a new battery can degrade almost entirely in as little as 3 MONTHS! However, the other extreme – leaving your battery to run right down – can be equally damaging. Allowing your MacBook battery to regularly get down to critical levels (anything below 10%) can lead to it being unable to hold charge in the future. So what should you do?
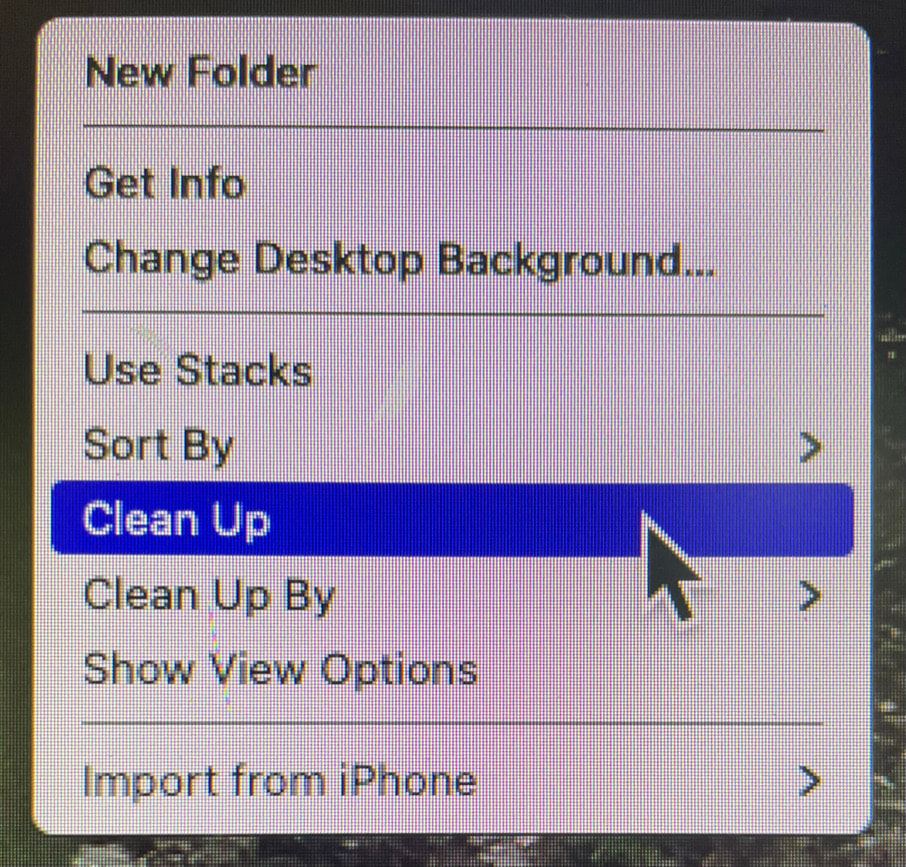
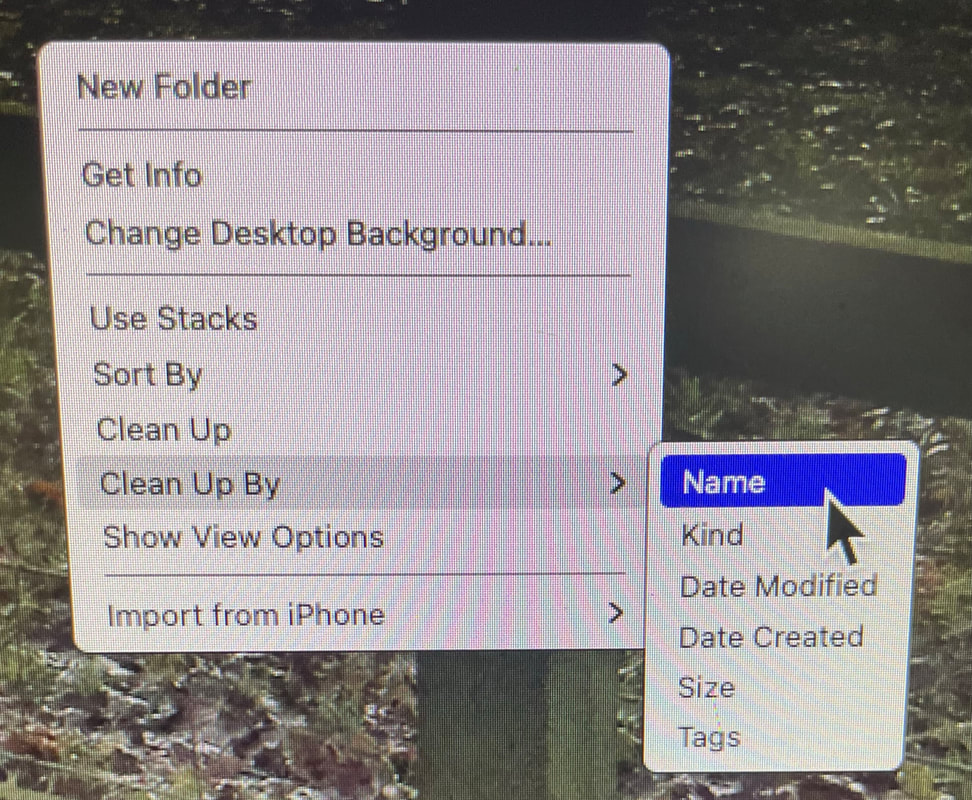
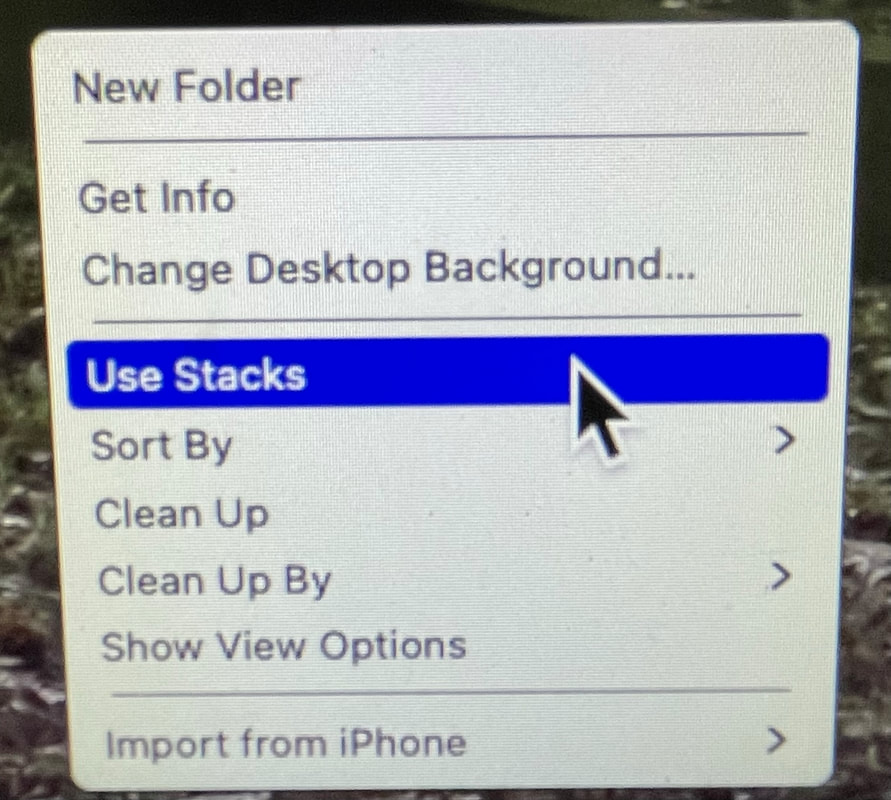
One final point to mention is temperature. Whilst less of an issue in the UK than in other parts of the world, it is still worth being aware that your MacBook has a ‘comfort zone’ for usage of between 10 and 35 degrees Celsius, and can be safely stored between -20 and 45 degrees Celsius. In practice, this means avoiding leaving your laptop in a hot car, or storing it in a place that gets particularly cold. Also, keep in mind that the device emits its own heat when in use, and particularly when charging, so keep an eye on how hot it is getting. We see a lot of laptops that have sustained damage from overheating, and one of the biggest culprits is leaving the device snuggled up on a duvet on the bed whilst charging! Lastly, if you have a MacBook that is struggling with poor battery life, it may be time for a new battery. Give us a call on 01403 753666, via email on info@b-apple.co.uk, or pop in and see us at our office in Alfold – visit Contact Us for the address. Look after those batteries! Periodically tidying up your Mac can help to free up storage space, potentially improving the performance of your machine, as well as making your desktop a nicer place to work! And the basics are easier than you might think. So let’s get started! 1. Clear your desktop Is your Mac desktop tidy, or can you no longer see your desktop image beneath the clutter of icons? If it’s the latter, here’s how to tidy it up. Right-click (ctrl + click, or 2-finger tap on trackpad) on any open space on the desktop which brings up a menu. Scroll down to ‘Clean Up’ and your icons will be neatly laid out on the desktop. You can also select ‘Clean Up By’ to order the icons by name, kind, date modified, etc. Alternatively, if you have lots of files of the same type, you could tick ‘Use Stacks’, which will neatly stack all files of the same type on top of one another.
 Finally, click on ‘Manage’ and a window will open up with a list of recommendations for optimising your storage. Work through these to see how much space you could save! 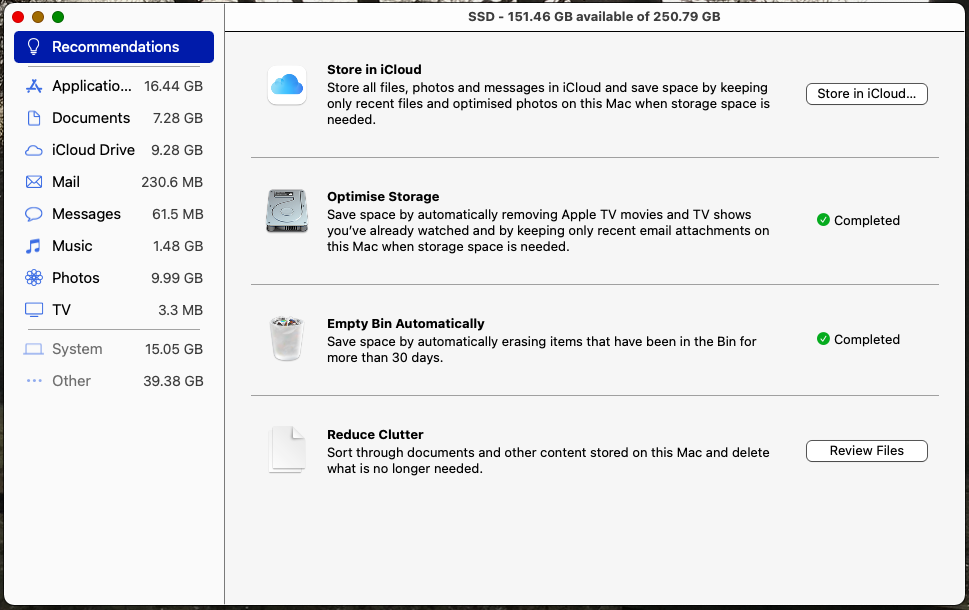 We’ve all been there. That accidental press of a key, and whoosh - it’s gone! But has your file disappeared forever? As with many things in life (particularly computers), the answer is ‘it depends’. More often than not, a deleted file is sent to temporary storage, where it sits for a certain period until it gets emptied automatically. But even if a file hasn’t been stored in this temporary location, it still doesn’t necessarily mean it has been permanently destroyed. Read on to find out more… As a general rule, when a file gets deleted the OS (operating system) recognises that it is no longer needed. It then marks up the storage space that file is occupying as ‘available for use’. So, until some other data is written over it, one can restore the deleted file with the help of a specialised utility. You may have now guessed that the most important thing to do after accidentally deleting a file is to STOP what you are doing!  To have the best chance of being able to recover deleted files from your SD card, flash drive, hard drive or any other external storage medium, you should shut down the computer or unmount the drive, and - if you are not au fait with data recovery - seek professional assistance.
To get the lost files back with maximum efficiency, please do not start up the computer/drive again before the Data Recovery specialist has had a chance to look at it for you. If you are experiencing a deleted file emergency, or have any other data recovery requirements, please call Richard on 01403 753666. |

 RSS Feed

Blue Apple Systems Ltd
Unit 6 Alfold Business Centre Loxwood Road, Alfold Surrey, GU6 8HP 01403 753666. |
Blue Apple Systems Limited is authorised and regulated by the Financial Conduct Authority. Blue Apple Systems Limited is not a lender, but a licensed credit broker, licensed to introduce borrowers and lenders
for the purposes of entering into short-term leasing agreements. Blue Apple Systems Limited does not charge customers a fee for using its broker services, but receives a 1.5% to 2% commission from lenders if a customer enters into a consumer credit agreement with a lender following introduction. © Blue Apple Systems Ltd 2015. All Rights Reserved. Blue Apple Systems Ltd is registered in the UK. Company registration number 05110252. VAT No 827058618. All prices are subject to VAT at the current rate of 20%. |